Monday, August 22, 2016

Michelada Pops

The idea for these Michelada Pops came from last Saturday's preseason Rams game. While standing in the beer line, I noticed a woman carrying a beer and a tomato-colored popsicle wrapped in plastic. Then I overheard her say it was a Michelada. 
Whoa! Wait just a minute? A Popsicle Michelada! ...what a genius idea! 
Where can I get one of those? Sure enough, the vendor to the right of us was selling beer with flavored popsicle chasers! They had about 5 different flavors of pops. 
I thought...I SO HAVE TO MAKE THESE AT HOME!
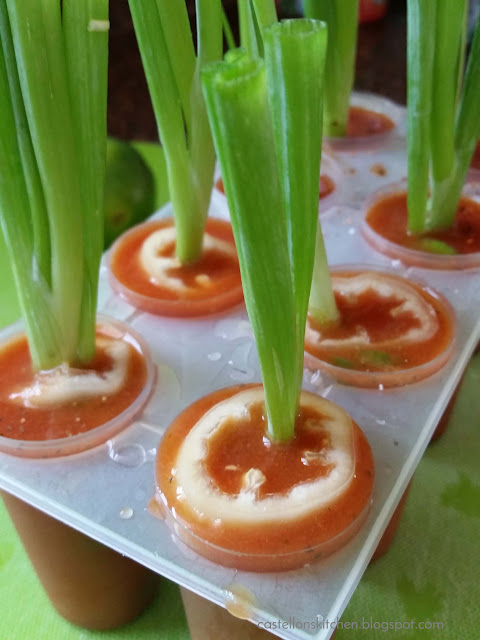
The next day, I picked up some V8® and peppers and this is what I came up with. I like spicy food and since I'm not much of a beer drinker, the spicier the Michelada the better. I added sliced Serrano peppers with the seeds and the yellow wax peppers just to give it that extra heat. Green onions aren't your typical ingredient for Micheladas, but I love the pop of pretty green. Plus it just looks way cool sticking out of the Pops as a edible popsicle stick.
Feel free to experiment with different flavors, like Habanero and mango; olives, pepper, and worcestershire sauce; or omit the spice all together and make a typical Michelada of tomato juice, lime and salt. Add other ingredients like soy, teriyaki sauces, radishes and celery...the sky's the limit!  Salud!


Michelada Pops

Makes 8 

4 cans of V8® Vegetable Juice
1-2 Serrano chilies, sliced
1 yellow pepper, sliced seeds removed
2-3 limes, juice and lime slices
8 green onions, trimmed
Tajin® Classic Seasoning

8 bottles Mexican Beer

Slice Serrano chilies and drop a few of them into the bottom of each mold. Squeeze half a lime and 1/4 tsp of Tajin® seasoning into each mold. Fill to about 1/4 inch of the top with V8® vegetable juice. Add green onion into the mold and thread a yellow pepper ring over the green tops until it sits on top of the V8® juice. The yellow pepper ring acts to stabilize the green onion while the pops freeze. Place pops in freezer for 4-5 hours or until pops are set. Rim the glass with Tajin® and fill glass with your favorite beer and drop a Michelada Pop in and let it cool and flavor your beer. The longer it sits the spicier it will get. Add more lime as needed. Enjoy! 
Other recipes to try:
Pork Verde Stew
Zucchini Enchiladas
Vegetable Ceviche
        

Monday, August 15, 2016

Night Crawlers con Funghi

When I was a little girl, I loved to play in the dirt. I loved the smell of dirt, and much to the horror of my parents, I even liked the taste of dirt as I frequently sucked on rocks to get them clean. I know...pretty strange kid huh? My parents are probably surprised that I didn't die of trench mouth. 
One summer at my Grandma's house, my brother, sister and I got the hose and flooded her flowerbed and got nice and muddy making mud pies. We made dozens of pies loaded with sticks and grassy weeds popping from the gooey masses. We added a sprinkle of dirt on some and dried leaves on others. We uncovered earthworms and added them in the pies. Occasionally a worm or two were sacrificed as they tried to wiggle free from the mud pie. I remember feeling happy as we worked with a surprising amount of cooperation. We rarely did anything together that didn't involve arguing or eventual tears. Apparently, making a mess together builds teamwork. We eagerly lined up our mud pie masterpieces on sunlit patches of grass to dry. We were so proud of ourselves as we looked at the fruits of our labor... "Let's show Grandma!"
We didn't go far to find her because Grandma found us. Our excitement faded quick. The shock and horror on her face obvious as she looked at the mess we made of her flowerbeds...No more mud pies


Obviously we got in trouble, but we sure had fun doing it. It was worth the trouble. I still like playing in the dirt when I go out to garden and thankfully I gave up sucking rocks. Inspiration for this dish came from making mud pies and playing with worms. Nightcrawlers con Funghi is a fun Halloween dish that's hearty and packed with savory flavor from the sauteed pancetta, onions, garlic, and mushrooms tossed with rosy-hued Udon noodles and toasted garlic breadcrumbs...It is so delicious! (I'm eating leftovers as I write this!) 
Imagine the fun you can have plating this dish at your next Halloween party. Serve it in large flower pots with shovel serving spoons or serve individual plates on a garden trowels spilling over onto dirt breadcrumbs, like I did below. Serve it warm or room temperature. Either way, it is simply delicious! Happy Halloween!


Night Crawlers con Funghi (Noodles with Mushrooms and Pancetta)

Serves 4

1 small onion, sliced
5 oz. Pancetta, diced
4 cloves garlic, thinly sliced
2-3 cups baby Bella mushrooms, halved
1 T olive oil
1 T butter
1 t fresh thyme leaves
salt and pepper (to taste)

2 packages Udon Noodles
1/4 t each orange and purple gel food coloring

1 cup Panko Bread Crumbs
1 T butter
1 t garlic powder

Breadcrumbs
Melt 1T butter in a small skillet over medium high heat. Add panko bread crumbs and garlic powder and toast breadcrumbs until they are a dark brown, stirring frequently to ensure they don't burn. Set aside.
Mushroom/Pancetta Mixture
Add butter and olive oil to large skillet over medium high heat. Add onions, mushrooms and pancetta and saute for about 10 minutes. Add garlic and thyme leaves and continue to saute until pancetta and onions are browned, and mushrooms are cooked to desired tenderness. About 10-15 minutes more. Add  salt and pepper to taste. Turn off heat and set aside.
Udon Noodles
In a small bowl add 3-4 cups water and add approximately 1/4 t. each of orange and purple gel food coloring and whisk until dissolved and the water is an orange-brown color. Transfer water into a saucepan and add Udon noodles. Let noodles sit for about 10-15 minutes to color the noodles. Once desired color is achieved, cook the noodles according to package directions and drain. Add noodles to skillet with mushrooms and pancetta and stir fry until noodles are coated. Top with additional thyme leaves and breadcrumbs and Enjoy!


Other Halloween Main Dishes to try:
Love at First Bite Linguini                           Midnight Sushi                             Fiendish Fingers

Friday, August 12, 2016

Summer Corn and Red Quinoa Salad


This is one of those accidental throw together salads that I made last summer that turned into something really refreshing and summer wonderful.  I am a huge fan of Greek flavors...cucumbers, feta cheese, roasted red and Greek peppers...what's not to love, right? The brightness of the lemon zest really makes these ingredients sing and makes for a nice change of pace from your typical vinaigrette pasta salad. It goes very well with BBQ chicken, ribs, sandwiches, and even as a topper to your favorite mixed greens

Feel free to substitute with orzo pasta or another small pasta if you don't like quinoa. I like using quinoa because the small grains hold the dressing well and packs flavor in every bite, plus you get the added protein. Also if you are not a fan of pepperoncini substitute with green olives.  I used red quinoa for contrast in the photos so feel free to use your favorite. Happy Summer Days!  


Summer Corn and Red Quinoa Salad

Serves 8

1 cup quinoa, rinsed, prepared and cooled
1 lb corn frozen kernels or 3 cups of fresh yellow corn
3 Persian cucumbers, diced
1 bunch green onions, chopped
1 cup roasted red bell pepper, diced
1 cup feta cheese, crumbled
pepperoncini, finely minced
generous amount of zest of 1 lemon

Greek Vinaigrette

1/2 cup olive oil
2 T red wine vinegar
1-2 cloves garlic, minced 
1 T Dijon mustard
Juice and zest of 1 lemon 
1 t. oregano
Salt and pepper (to taste)

Prepare quinoa according to package directions. I used chicken broth but you can substitute with water or vegetable broth. 
Prepare vegetables. I used frozen corn to add to the hot quinoa to quicken the cooling process, but you can use corn cut from the cob once the quinoa is cooled. Add veggies, cheese and dressing and mix. Refrigerate for an hour or overnight. Add additional dressing if needed. 
Other summer recipes to try:
Quinoa Spring Rolls
Pineapple Chicken


Corn, Tomato and Basil Salad


Thursday, August 11, 2016

Open-faced Caprese Sandwiches


Getting a local Farmers Market in our small suburban city a few months ago was awesome in and of itself but to have it within walking distance from my home... Priceless! I make a trip every Saturday (okay...maybe every other Saturday) to pick up my favorites like broccoli, asparagus, and summer fruit for the kidsBut for me, the best part about farmer's markets is finding new, fun ingredients and products from small, local businesses to try. I fill up my bag with luscious vegetables, savory sauces, and loaves of artisan bread and stroll home dreaming of what to make with all these treasures. I call it #playingwithfood on my Instagram page


During my last trip, my friend Rob from Arising Dough asked me to sample his new Pesto Bread. I was honored to try it and let me tell you... it was delicious and full of basil flavor with sunflower seed kernels that gave it a surprising nuttiness and whole grain feel. I could just imagine it being turned into a gooey, cheesy, pesto garlic bread, or savory croutons for soups and salads, and of course the countless sandwiches one could make with this delicious savory bread. I asked if he had any more that I could buy and he gave me the rest of his sample loaf to play around with.

Pairing this pesto bread with some gorgeous heirloom tomatoes and some fresh basil from my garden, I made these open-faced Caprese Sandwiches...or, I guess I could've called them just plain ol' Bruschetta since that's basically what they are, except meal size. Starting with big slices of grilled pesto artisan bread, sprinkled with a aged goat cheese and topped with chopped heirloom tomatoes, fresh mozzarella, garlic and basil and a splash of balsamic makes a delicious light lunch paired with plenty of summer heat and lime infused ice water! Enjoy!

Open-faced Caprese Sandwiches

Serves 2

2 large heirloom tomatoes, chopped
1 cup fresh mozzarella cheese, chopped
2-3 T fresh basil, chopped
1 clove garlic, finely minced
1 T olive oil
splash of balsamic vinegar


4 slices of artisan bread of your choice (I used Pesto Bread from Arising Dough)
Butter or olive oil for pan frying
Sprinkle of aged goat cheese (I used Achadinha's Capricious) substitute with a hard aged cheese i.e.Parmesan Reggiano)
kosher salt and fresh cracked pepper (to taste)

Prepare vegetables and mix first 6 ingredients together. Set aside. 


Butter bread and pan fry until golden brown on each side. Grate aged goat cheese over hot bread and remove from heat. Top toasts with Caprese and additional basil and fresh ground pepper. Enjoy!


Other recipes to try: 
                   Zucchini Bruschetta            Caprese Salad with Pesto Vinaigrette