Showing posts with label Chocolate. Show all posts

Wednesday, March 18, 2020

'Let Nature Run Its Corpse' Cakes

Halloween Cupcakes

After missing all of last year's "Summer of Halloween" because of a health issue, I'm starting extra early this year on my Halloween recipes and decorating ideas.  I realize it's only March, but some of my Halloween ideas have been inspired by other holidays. For instance, my Haunted Hamlet was inspired by Mini Christmas Villages, my Halloween Topiaries were created by transforming Christmas Angels, and My Bloody Valentine Cake inspired by... of course Valentine's day.  These festive cupcakes that I like to call, Let Nature Run Its Corpse Cakes were inspired by all the mossy Spring/Easter pins all over Pinterest right now. Seeing all the bunnies and eggs cushioned in baskets of moss, I took it another direction all together...instead I went with aged skull and crossbones put to rest in shallow mossy graves. ☠ I think they're absolutely perfect for Halloween, don't you? 
Halloween cupcakes

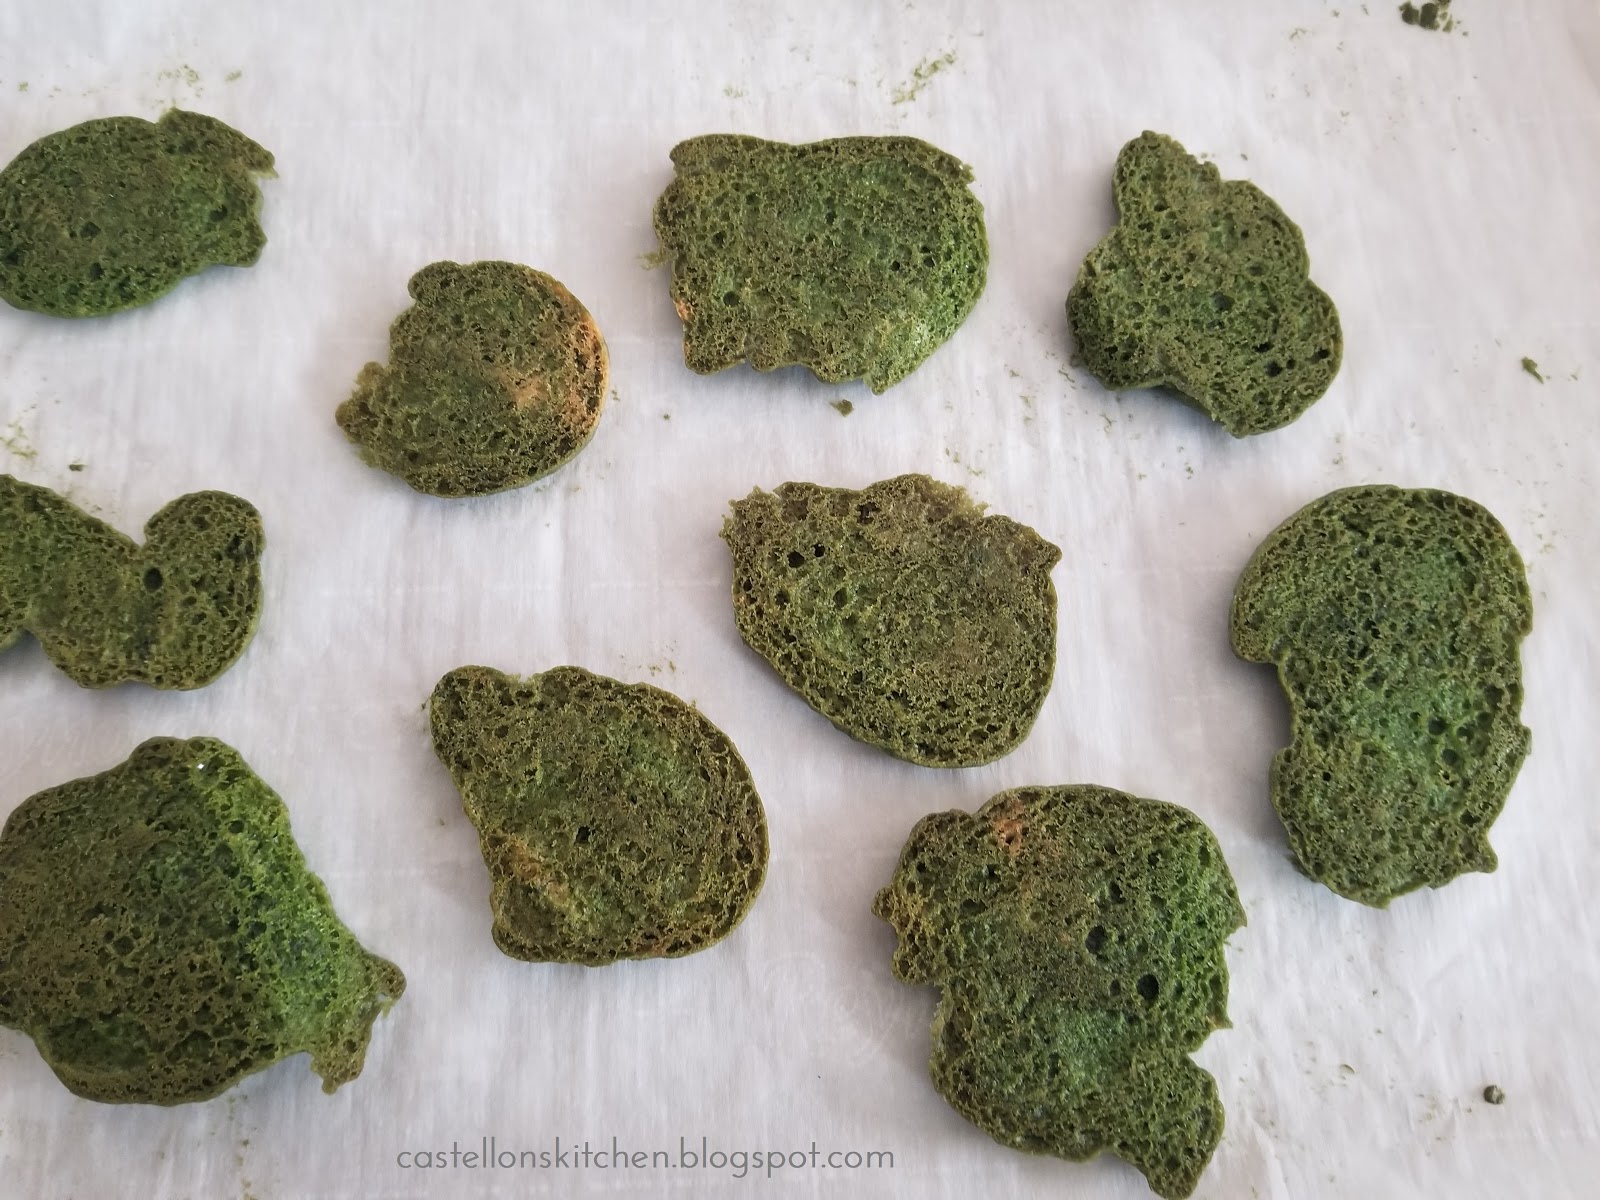
The faux moss looks so realistic that it's hard to believe that these cupcakes are edible. Creating the faux moss-look was super simple. I added a few drops of moss colored food coloring to ready made sugar cookie dough and baked as usual. Crumble half of the cookies and sprinkle the underside of the whole cookies with the cookie crumbs to give you faux moss covered cookies. I topped them with aged white chocolate skulls and crossbones that I made with mini molds purchased from Etsy. I've included the links below.  

These little gems are the perfect recipe to kick off my Organic Halloween theme this year. All my Halloween food and decorating ideas will center around all things green, black with natural organic elements like moss and ferns, twigs and wood. It's going to be so much fun...Stay tuned for more Halloween ideas coming all spring and summer long. 

Let Nature Run Its Corpse Cakes 

Makes 24 cupcakes

Make ahead:
Chocolate Skull and Bones
1 package melting white chocolate 
1/2 t. cocoa powder 
1 T vodka
Mini Skull mold by StaceyDecor 
Mini Bone mold by Moldcreationsnmore 

Melt chocolate according to package directions and transfer into a piping bag or a plastic ziplock bag with the corner cut off.  Pipe melted chocolate into molds and tap the bottom of the molds on counter to settle chocolate and remove air bubbles and empty space.  Place filled molds in the refrigerator and let set for 15 minutes or longer as needed. Remove skull and bones from the molds and set aside. Don't worry if the small crossbones break, they can still be used with the skulls. Repeat until you have 24 skulls and 48 bones.
Aging bones: In a small bowl, add 1 tsp. cocoa and 1T vodka and mix until combined. Use a paint brush to paint the chocolate skulls and bones with the cocoa vodka mixture to age the bones. The vodka will evaporate and leave the cocoa behind creating an aged look of the bones. Set aside until ready to use. 


Mossy Cupcakes 
1 box chocolate cake mix
1 can prepared vanilla frosting
1 tube prepared sugar cookie dough, room temperature
moss green gel food coloring
black cupcake liners

Cupcakes: Prepare cupcakes according to package directions. Cool completely.
Frosting: Combine ~1/4 tsp. of moss green gel food coloring to vanilla frosting and mix well. Set aside.
Cookies: Place prepared cookie dough in a medium bowl and add about 1/2 tsp. moss green gel food coloring and mix until well combined. 


Scoop about 1 tsp of cookie dough onto a parchment lined cookie sheet. Use a fork or a butter knife to press dough flat into irregular shapes. 


Bake for 10 minutes at 350 degrees. Cookies will have slightly brown bottom which is what you want to add depth of color to your mossy cookies.  Cool cookies and set aside 30 small cookies to top your cupcakes with. Crumble the remaining cookies or the larger cookies into a medium bowl and set aside. This will be used to top your cupcake frosting and to add mossy texture to the sugar cookie topper. 

Assemble: Frost cupcakes and dip frosting side down into crumbled cookies to create the mossy top of the cupcake. Next, lightly frost the bottom side of a sugar cookie. Now place a small dollop of frosting on the other side of the cookie to act as a glue to hold the cookie to the top of the cupcake. Now sprinkle crumbs over the slightly frosted cookie bottom to complete the mossy look. 


Garnish: Top with skull and crossbones secure with a small dab of frosting. 

More Halloween Dessert Ideas:

Jack-o-lantern Cupcakes
Bad Moon Rising Cheesecake
My Bloody Valentine
Haunted House Cake Topper

Monday, October 21, 2019

Bad Moon Rising Cheesecake (Bittersweet Chocolate Cheesecake)

Halloween Food

It's funny how one idea morphs into something completely different after the first attempt crashes and burns. This super decadent and gorgeously dark bittersweet chocolate cheesecake began as an idea for an easy no-bake chocolate cheesecake, made with a ready made cookie crust topped with a jack-o-lantern face made of melting chocolate. In my mind, I envisioned it to look like a larger version of my Jack-o-lantern cupcakes. Seemed pretty straight forward, right? And the best part, was that it was supposed to be quick and easy... What could go wrong with a no bake cheesecake, ready-made cookie crust and a jack-o-lantern face? Well...Let me tell you...a whole lot could go wrong with this silly, simple idea.  First and most importantly, the no bake cheesecake was not good. The texture was too soft. It was not dense like a cheesecake should be. Honestly, the best part of it was the damn cookie crust. But the kicker was, and I should've known based on my hate-hate relationship with those pesky candy melts...the candy melts nearly broke me this time. I'm still cursing those little buggers because i could not get them to cooperate. My jack-o-lantern face was a hot mess. So I threw the whole thing into the garbage. 

I also scrapped the notion of quick and easy and decided to make a real baked cheesecake with homemade cookie crust instead. Which was way easier afterall. It baked in a low temp oven for over an hour so there was  no work involved to watch it bake. When I pulled it out of the oven, I realized I forgot to tap the pan a little to get the air bubbles out of the batter because the cheesecake came out looking a whole lot like the surface of the moon with little craters and divots. 
Sometimes the best part about making Halloween food is that the imperfections become the inspiration for the dish! I ditched the jack-o-lantern idea after brainstorming with my husband and toyed with the moon idea since the cheesecake now looked like a moon, a New Moon, an Eclipsed Moon...I doodled some ideas and my husband came up with Bad Moon Rising. And instead using those dastardly Candy  Melts, I made my bad moon face out of Cookie icing. Enjoy! 
🎃10 days until Halloween🎃


Bad Moon Rising

Bad Moon Rising Cheesecake (Bittersweet Chocolate Cheesecake)


Crust
1 package chocolate sandwich cookies (I used Dark Chocolate Oreos®)
2 T melted butter
Batter
2-8 oz. packages cream cheese
1 t. vanilla extract
2/3 cup sugar
1 T all purpose flour
1/2 t. ground cinnamon
3 eggs
1 cup semi-sweet chocolate chips melted in 1 T cream
1 oz. black food coloring 
Decorating
Black cookie icing or black candy melts
Black sugar crystals
Template (see below)

Preheat oven to 275 degrees.

Crust: Place cookies in a food processor and process cookies into crumbs and transfer crumbs into a small bowl. Add melted butter and mix until well combined. Line the bottom of a Springform pan with a round of parchment paper or spray lightly with cooking spray. Press crumbs into the bottom of the pan and smooth out crumbs to create an even firm crust. Refrigerate while prepping the cheesecake batter.

Batter: In a large bowl, beat cream cheese and vanilla until combined.  Add sugar and beat until fluffy. Add flour and cinnamon and mix. Beat in eggs one at a time, scraping down sides of the bowl after each addition. 

Melt chocolate: In a microwave-safe bowl, add 1 T cream to chocolate chips and heat for 1-2 minutes on defrost setting of your microwave. Take care not to overheat. Stir well until smooth and let cool on counter a bit. 

Add melted chocolate into batter and beat until combined. Add black food coloring until desired color is reached. (Note:The batter will darken upon baking.) Pour batter into prepared Springform pan. Place pan on a cookie sheet and bake at 275 degrees for about 1 1/4 hours or until center of cheesecake is firm.  Cool for 15 minutes and then run a knife around the edge of the Springform pan to loosen the cake from the sides. Cover and refrigerate for 4 hours. When read to serve, run a knife around the edge again and remove the Springform pan from the cheesecake. 

Decorating: Draw a template on parchment paper (see below) and place another piece of parchment over the template so you can make a few faces with icing or candy melts until you get the look desired. The icing is very fragile when dried, so you'll want to make them thick and let them dry completely, usually overnight. I placed a small fan on mine, overnight. If using candy melts, place in fridge to firm up. When completely dry, gently peel parchment back to release the face pieces, but be very careful, they will break if you move peel too quickly.  


After your face pieces are ready, cut the half moon shape out of your template and place the non-face side of your template on the cheesecake. Sprinkle black sugar crystals to the exposed cheesecake to create a dark side of the moon. Carefully remove the parchment template to reveal the black sugar half moon. Place your pieces onto your cheesecake to transform this basic cheesecake into a Halloween ready piece of art! Happy Halloween!

Other Halloween recipes to try:

My Bloody Valentine
Jack-o-lantern Cupcakes

Tuesday, October 15, 2019

Haunted Gingerbread Cake Topper


OK, so it's been almost a year since I've blogged. My absence was partially because I was working on moving my blog to a website at castellonskitchen.com, but I realized that I needed a lot more work done on it. Work that I needed to pay someone to do. So I've put it off. But the biggest reason for my absence, was that I had some issues with my last mammogram in April which led to a diagnostic mammogram to look at the area of calcification in my left breast. That then led to a biopsy to get a look at he cells from that area. Biopsy Result: Atypical Lobular Hyperplasia. The good news was that it was not cancer. However, the presence of these cellular changes indicated increased risk of developing breast cancer in that breast. 
So the first step was to remove the area of calcification. So in June, I had surgery (lumpectomy) to remove the 2 inch area of calcification. Result: Pathology report revealed that there was no healthy margin of cells present in the removed tissue. Translation: We didn't get it all. 
The next step was to review my options. Since it wasn't cancer, I had time to decide. My options were to begin hormone treatments to reduce risk along with increased mammogram screenings. Which, in my mind, that meant waiting for it to turn into cancer. The other option was to remove the breast. After consultation with my doctors and my husband, I decided to have the mastectomy to remove my left breast. I had a mastectomy 4 weeks ago and I'll undergo reconstruction in December. For me, it was the right decision and the pathology report validated it. The pathology report on the removed breast showed extensive atypical lobular hyerplasia and lobular carcinoma in situ throughout the breast. I can't help but think that if I had taken "the wait and see approach" and waited another 6 months to the next screening, I might have gotten a very different result. So the moral of my story is that I caught these changes in my breast tissue early through regular mammogram screenings. If you are weary about getting your mammograms each year, I know they are not the most comfortable things to get, but don't wait. Not only is October the happiest time of year for this Halloween-loving gal, it's also Breast Cancer Awareness Month, so use this time of heightened awareness to schedule your mammogram today! 


With these health concerns dominating my energies, I missed my annual Summer of Halloween this year which was a total bummer! But not to worry, I have this fun little recipe to get the Halloween juices flowing, even if it's a little later than usual. Reward all your efforts in self-care and do something fun! Pull out your stash of Halloween sprinkles and make this adorable Halloween Gingerbread Cake Topper! 🎃 Happy Halloween!

P.S. I must confess that I actually made these haunted Gingerbread houses at Christmastime last year after being inspired by a Mini Gingerbread Cookie Cutter I purchased from Cost Plus World Market. Since it's not Christmas, you can pick one up here to make your Halloween Houses. 


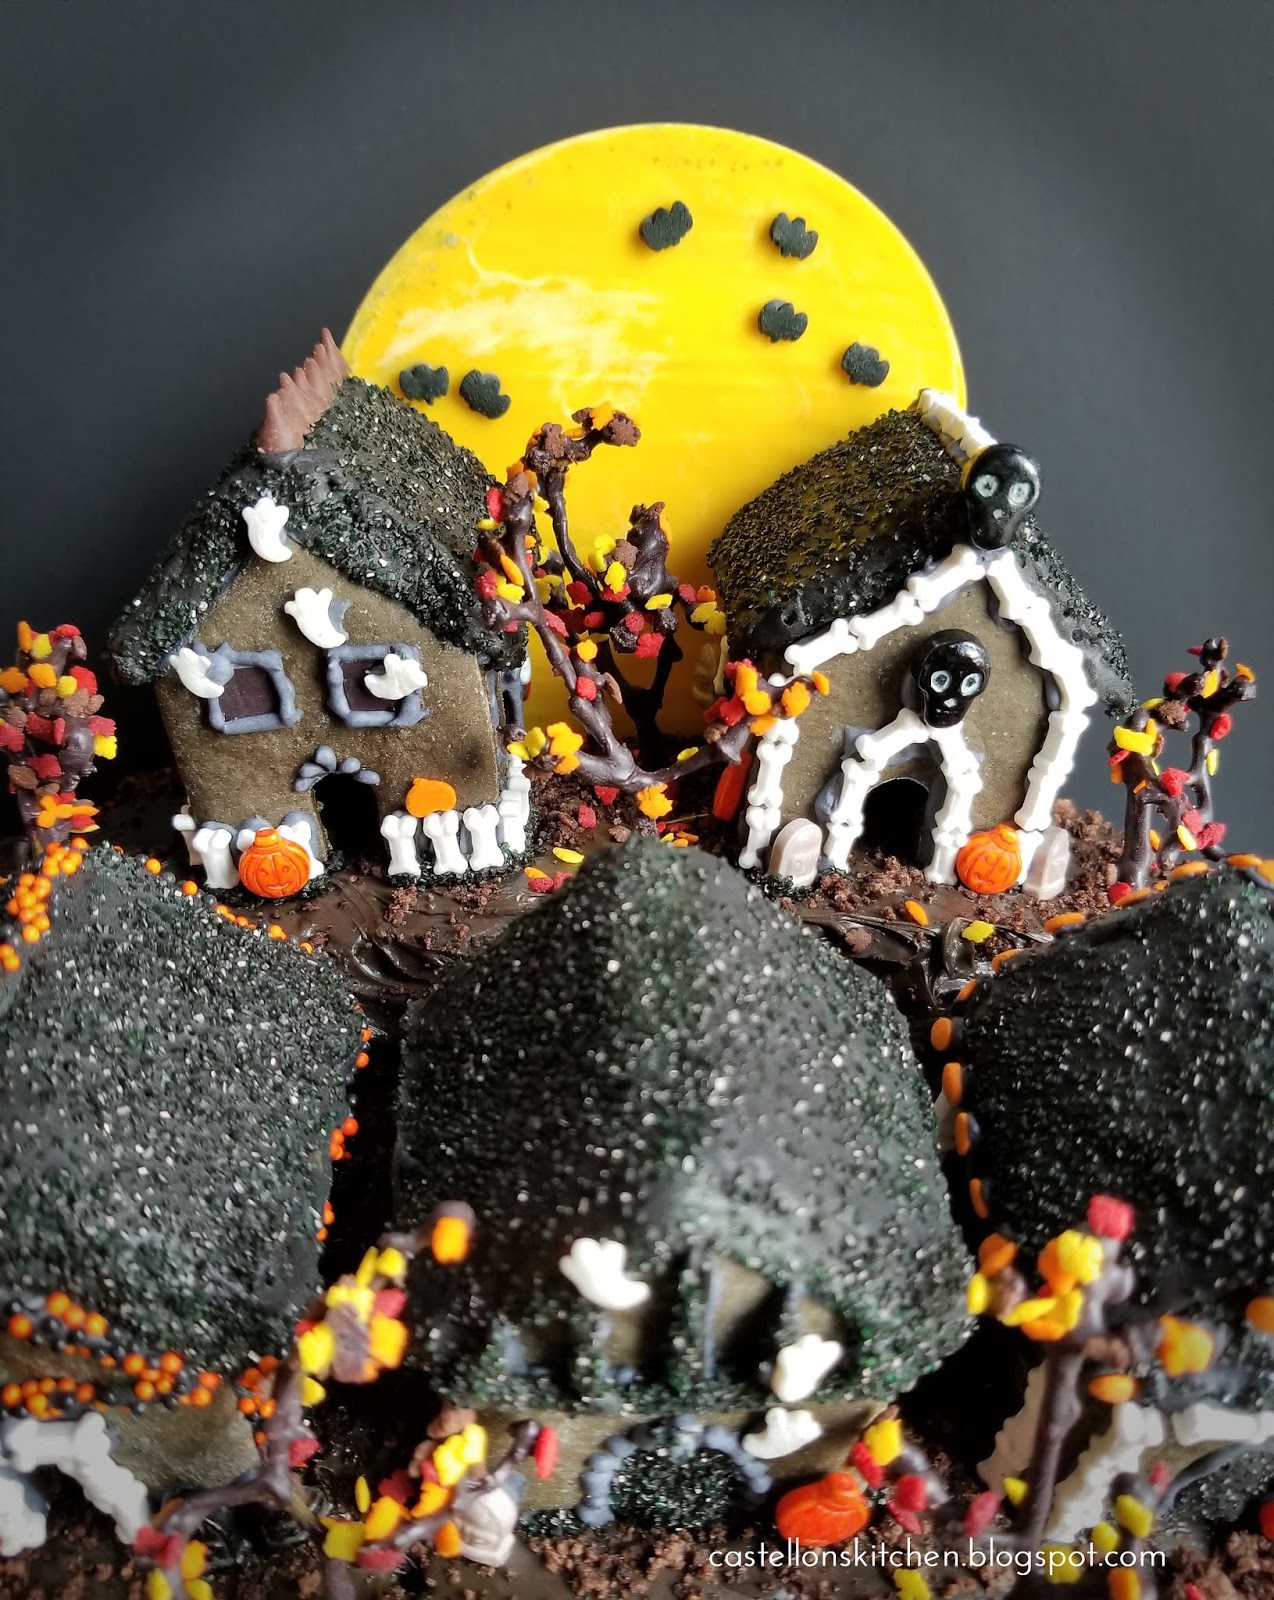
Haunted Gingerbread Houses

1 stick butter 
1/2 c brown sugar
1 cup molasses
2 eggs
Black gel food coloring (to desired darkness)
4 cups flour plus more as needed
1/2 tsp baking soda
1/2 tsp salt
2 T cloves
2 T cinnamon
2 T ginger


Royal Icing with added black food coloring
Betty Crocker® cookie icing, black
Black sugar 
Various Halloween sprinkles (tombstones, pumpkins, bats, bones. eyeballs and ghosts) 
Yellow Candy Melts (moon)  
Favorite box Cake and chocolate frosting
Crushed chocolate sandwich cookies 
Chocolate rocks, black          

Preheat oven to 350 degrees.  

Cream the butter and sugar.  Add molasses and eggs and black food coloring. Add dry ingredients and mix until incorporated. Turn out on floured surface and add more flour until dough is not sticky. Portion out dough into small balls that can be rolled out to 1/8" thickness and to the dimensions that fit the cookie cutter.  Place individually rolled dough on parchment lined cookie sheet and cut out gingerbread houses with floured cutter on the cookie sheet. Remove excess dough. Bake in a 350 degree oven for 10 minutes and cool.

Royal Icing

2 cups powdered sugar, sifted
1.5 T meringue powder
1-2 T water (to desired consistency)
Black gel food coloring

Add sugar and meringue power into a bowl and add 1 T of water and black food coloring and mix until you reach a stiff consistency that remains fluid enough to pipe but not drip. Add additional water and/or food coloring until desired results.  If too thin add more sugar. Spoon icing into a piping bag or bottle with piping tip. 

Begin assembling your cookie cutter gingerbread houses with royal icing and letting the royal icing dry completely. 
I used Betty Crocker® cookie icing in black to color the roof and then sprinkled it black sugar while still wet and let it dry to a hard icing. Use your imagination to attach Halloween sprinkles to decorate each house. 
Grape Stem Trees
For the trees, I cut off small branches of grape stems and coated them in melted chocolate and sprinkled with micro mini fall leaves while the chocolate was still wet. 

Candy Full Moon
The full moon is made by tracing around a large round cookie cutter on parchment paper to use as a guide when pouring your melted yellow candy melts to create your moon. Spread candy melts over the parchment circle overlapping the line just a bit. While the chocolate is cooled, but not yet hardened, use the same cookie cutter to cut a clean edged circle of yellow candy melts. Leave candy moon on the parchment to cool completely. Use royal icing to attach small bat sprinkles to the full moon. Set aside.  

Prepare Cake
Prepare box cake batter according to box instructions or make your favorite homemade cake. Pour 3/4 cup of batter into a prepared mini loaf pan. This small loaf will be used to make a raised tier for the two houses in the background. Pour the remaining cake batter into two prepared 8" cake rounds and bake the rounds according to package directions using the lower time in the range given on the instructions. Check for doneness, bake longer as needed. Bake the loaf pan for about 10-15 minutes, keeping an eye on it so it doesn't burn.  Let cool completely. 
Frost two layers of the cake and then add the mini loaf to the back half of the top of the cake. Test placement of the two background houses. If placement looks good. Frost rest of the cake. Crumble about 6 chocolate sandwich cookies in a food processor and sprinkle cake with cookie crumbles. 

Assemble your Haunted Hamlet
Add three houses to the foreground and two the the background. Use royal icing to attach the full moon to the backs of the two background houses for stability Add grape stem trees and tombstones and sprinkle micro leaves under trees until you reach your desired look.  I added black chocolate rocks to the base of the cake but if you can't find them, use your crushed cookies instead. 

Other Halloween recipes to try:

Thursday, October 25, 2018

Eye-Candy Cakes

I wanted to create a Halloween recipe that was so easy, that anyone could whip them up in less than an hour. Who has the time to fiddle around with multi step Halloween recipes, or shop for complicated ingredients. So these Eye CAndy Cakes are just that...Candy topped cake. Pick up a few bags of Eyeball Gummy Candy and a box of Red velvet Cake mix, pull out the chocolate syrup from the back of the fridge and you're good to go. It's ideal for a crowd of kids and gory enough for the most macabre adult dinner party. Happy Halloween!

                                   🎃🎃🎃 5 days until Halloween🎃🎃🎃

Eye-Candy Cakes

Makes 24

1 box red velvet cake mix
24 gummy eyeballs (I used only red iris eyeballs)

Blood Syrup
1/2 cup Chocolate syrup
1 tsp red food coloring

Bloody Icing
1 cup powdered sugar
1 T milk
2 tsp Blood Syrup(above)

Preheat oven to 350 degrees.
Prepare cake according to box instructions. Spray mini bundt cake pan with cooking spray and portion cake batter and fill half way. Bake for 10-12 minutes. Allow to cool in pan for 15 minutes then invert and cool on a rack. While the cakes cool, prepare the Bloody Chocolate Syrup and Bloody Icing in separate bowls.
Top each cake with a red gummy eyeball candy. Drizzle around the eyeball with Bloody Icing and then drip Blood Syrup over the eyeball and allow it to drip down the cake. Add more icing or Syrup until you get the right look.


Other Halloween Ideas to try:
Jack-o-lantern Cupcakes
My Bloody Valentine
Candy Corn Sugar Cookies