Despite having a food blog, I am like everyone else when it comes to indecision or boredom over what to make for dinner. I peek into the freezer and all I see are the usual suspects...chicken breasts, pork and ground beef. Not every meal is a blog-worthy meal in my house, Some days, I'd just as soon have a bag of Cheetos and a glass of wine for dinner. :)
So...I eyed the chicken thinking maybe I can make my standard, boring, weekly meal of grilled chicken, rice with salad. My kids are so tired of my grilled chicken, "I hate your chicken Mama!" They say. There's no accounting for my kid's taste, all the delicious food I make and they want chicken nuggets...where did I go wrong? (sigh*)
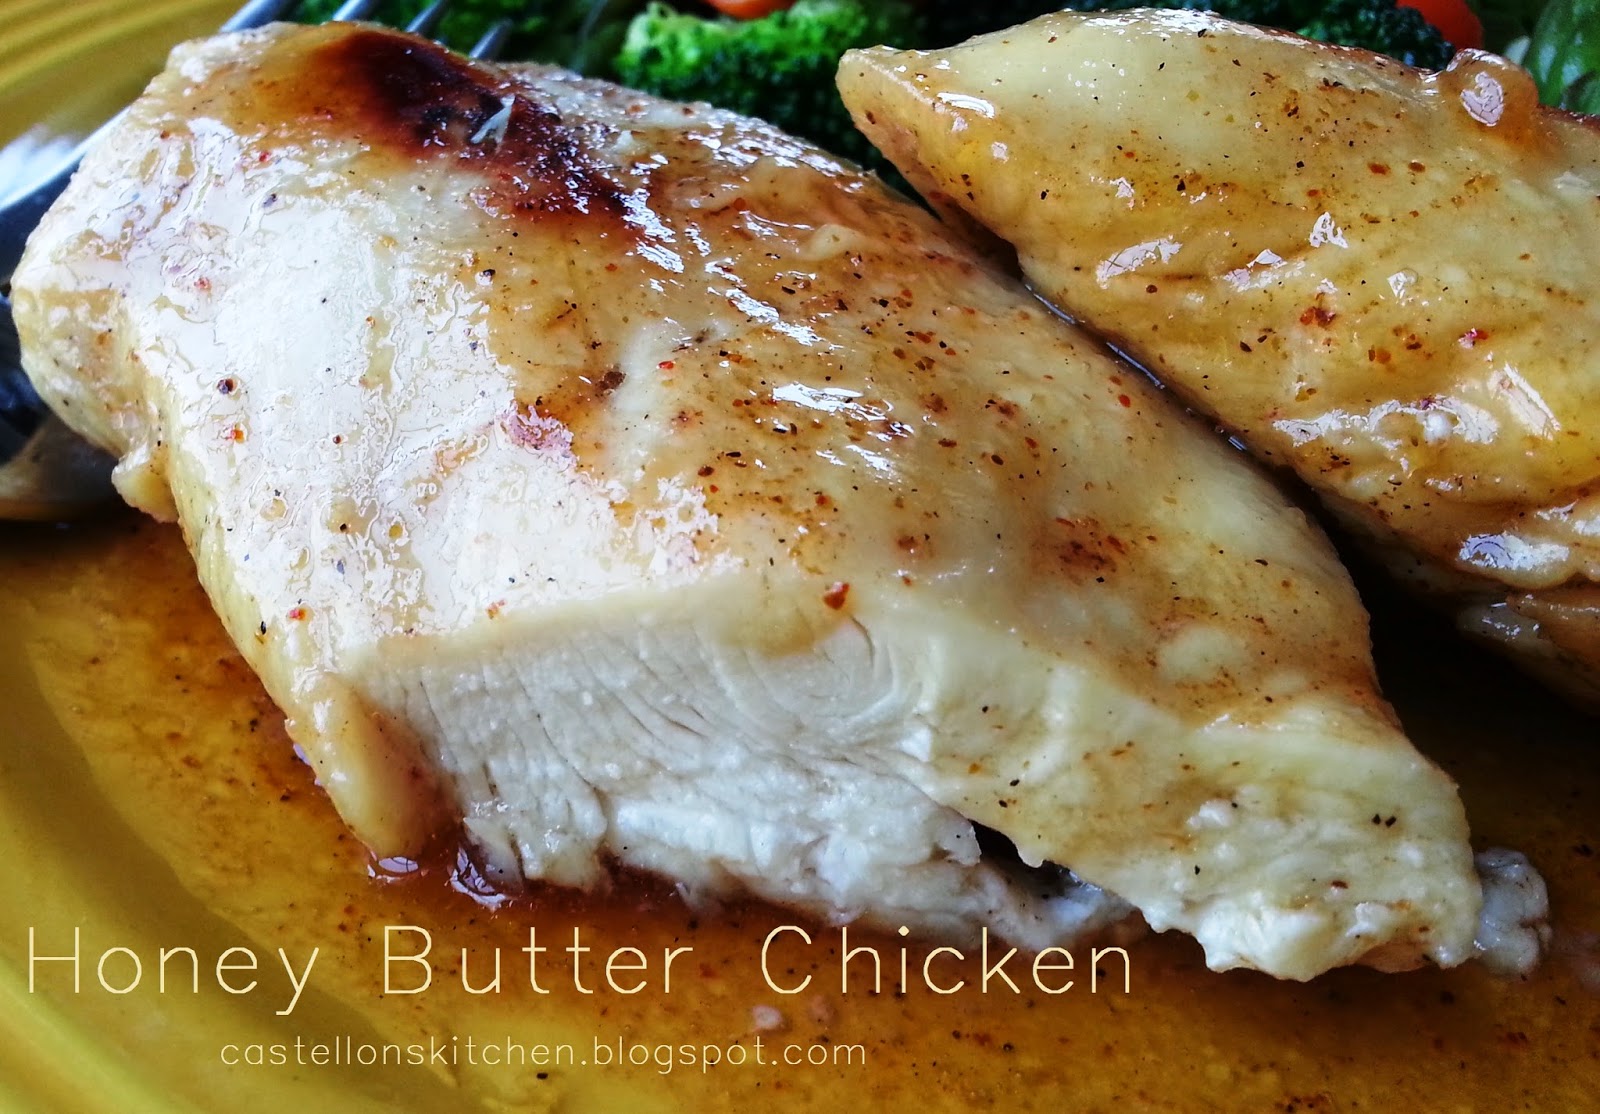
Anyway, it's hard to get creative over chicken, but I stumbled upon this amazing little recipe that will be sure to kick start your boring chicken menus. The original recipe was for pork tenderloin, which I gladly made as written and I absolutely loved it! The pork tenderloin was amazing with this yummy honey butter sauce. Slightly sweet and decadently buttery with a hint of spiciness. Delicious and I thought it would be perfect for chicken as well! So here's my slightly adapted version of that recipe using chicken that I'm sure will become a favorite in your house.
Note:
 I strongly recommend using clarified butter in this recipe.
What is clarified butter?
Clarified butter is butter
with the milk solids and some of the water removed. You remove these things by simply heating and melting the butter. Some of the water is removed via heating and the milk solids separate and remain in the bottom of the pan. The liquid portion, the clarified butter, is then poured in to an air-tight container for use. Removing the milk solids raises the smoke point
of oil which allows food to be cooked at higher temperatures without
the butter scorching or burning. It makes clarified butter ideal for sauteing vegetables and meats and making delicious butter sauces, like this one.
Trader Joe's carries convenient jars of clarified butter, but if you don't have a Trader Joe's nearby, you can make your own clarified butter simply, just by melting it in a saucepan. Easy!
Clarified Butter
2 sticks of unsalted butter, cut into pieces
In a large skillet, melt the butter slowly on low heat. Turn off heat and let sit for 5 minutes to cool slightly. Skim foam off the top and then pour the liquid butter into an air-tight container that has a tight fitting lid. Take care to only pour off the liquid into your air-tight container and leave the milk solids in the skillet. Use the butter in this recipe and then store the remaining clarified butter in the fridge.
I strongly recommend using clarified butter in this recipe.
What is clarified butter?
Clarified butter is butter
with the milk solids and some of the water removed. You remove these things by simply heating and melting the butter. Some of the water is removed via heating and the milk solids separate and remain in the bottom of the pan. The liquid portion, the clarified butter, is then poured in to an air-tight container for use. Removing the milk solids raises the smoke point
of oil which allows food to be cooked at higher temperatures without
the butter scorching or burning. It makes clarified butter ideal for sauteing vegetables and meats and making delicious butter sauces, like this one.
Trader Joe's carries convenient jars of clarified butter, but if you don't have a Trader Joe's nearby, you can make your own clarified butter simply, just by melting it in a saucepan. Easy!
Clarified Butter
2 sticks of unsalted butter, cut into pieces
In a large skillet, melt the butter slowly on low heat. Turn off heat and let sit for 5 minutes to cool slightly. Skim foam off the top and then pour the liquid butter into an air-tight container that has a tight fitting lid. Take care to only pour off the liquid into your air-tight container and leave the milk solids in the skillet. Use the butter in this recipe and then store the remaining clarified butter in the fridge.
Honey Butter Chicken (adapted recipe from foodgawker)
Serves 4
4 boneless, skinless chicken breasts
Cajun or Creole Seasoning
3 T clarified butter
4 T honey
~1/4 cup water
Generously sprinkle chicken breasts with Cajun or Creole seasoning and set aside. I used Creole seasoning. In a large cast iron skillet, melt clarified and honey together. Add chicken breasts to the skillet, as they cook, use a large spoon to ladle or baste the chicken with some of the honey butter sauce from the skillet. Cook chicken for 4-5 minutes per side. Remove chicken from pan and cover with foil to keep hot.
Honey Butter Sauce: To the warm skillet, add ~1/4 cup of water to the honey butter sauce, stir and heat for about 2 minutes. This step just adds some water back in that was lost during cooking and thins the sauce out a bit. Coat each serving with this decadent butter sauce and serve with your favorite side dish. Enjoy!

Other easy chicken recipes to try:
Easy Ranch Chicken
Chicken Florentine
Thai Chicken Enchiladas
Easy Chicken and Soy Chorizo Chili
It's been a while since I've cooked, let alone blogged. I've been too busy giving my time away to others to take the time for myself. But my kiddos are on Spring break this week and I've finally had some time to "Chillax" as my 8-year old Jackson says. And I'm thankful for the time off.
Basically, I've done next to nothing..I've read 4 books since last Saturday. It's been heaven being able to sink so deeply into these fictional worlds, an escape from reality. But I'll admit, I've felt a wee bit guilty because I've allowed my kids to play video games all day with the occasional break to play catch or take a bike ride...I'm sure the mom-critics (including my husband a few times these last few days) would say, that I'm being a bad mother by allowing it. But to be honest, I've needed the break.
Allowing endless video games and my submersion into fictional worlds aside, I realized I really need the break away from the kiddos.
I need to be just me, not a mom with a thousand responsibilities. I broke down to my husband and cried,..."I need a vacation!"
In fact...We both do. The last time we had any time off together was probably 2 or 3 years ago for our anniversary...sigh*
Back when we both worked full-time, vacations were easy to take because we had money to do it, whether it was a weekend trip or just a quick date night with a sitter. Back when we both worked, we had money to pay for someone to clean our house each week and we were able to go out to dinner if I got home late or if I hadn't made it to the grocery store.
These were convenience luxuries that made up for the time I was at work because, I couldn't do it all myself.
So on the days when the kids are on vacation from school, I want to be on vacation too and that's when I most miss those luxuries. I don't want to clean my house. I don't want to cook. I want to go out to dinner, sleep in, and let my kids play video games all day. A vacation at home.
Don't get me wrong, I'm not complaining. I love being home with the kids and I am so thankful for my husband working so hard to allow me to be home with them, I just need a small break to remember who I am and reconnect with my husband, who works so hard for us. I'm thankful for my husband being my biggest supporter when I feel lost, upset, conflicted or just plain tired. Especially lately... he has been my rock and my biggest supporter when I probably didn't deserve his constant support. He supported me when my priorities shifted away from us and then witnessed the toll it took with unhappiness.
I'm ashamed to say, I take him for granted too often.
He's always there to support and challenge me when I need it; he fights the good fight for me and against me when I need a wake up call.
I'm so thankful for this man whose had the misfortune to marry this head-strong, stubborn woman who seems impossible to please. I'm thankful for his ability to break through the toughness I throw up to protect my insecurities and how he selflessly works to make things all right.
In line with his generous and loving way to make everything all right...my husband heard my cry for a vacation and booked a two day trip for us! No kids. We leave today. I love you baby! :)
....So somewhere in the last few days between video games, reading, crying and vacation planning I made this amazing Shakshuka. If you are not familiar with the dish, like me, Shakshuka is a Tunisian dish of eggs poached in a spicy tomato sauce. I saw it on Pinterest and I was inspired to make it. I'd say it's most similar to the Latin dish, Huevos Rancheros, but if you remove the poached eggs, it's also reminiscent to Ratatouille. It's amazingly delicious! Enjoy!
Shakshuka (recipe adapted from Smitten Kitchen)
Serves 4-6
3 large Anaheim chilies, seeded and chopped
1 small onion, chopped
2 T olive oil.
5 cloves garlic, minced
3 cloves, roughly chopped
1 1/2 tsp cumin
1/2 Tbsp paprika, (I used smoked paprika)
1/2 tsp coriander
cayenne pepper (to taste)
Kosher salt (to taste)
1- 28oz can of whole tomatoes, crushed
1 cup of fresh tomato puree
4-6 eggs
pita bread
feta cheese
fresh spinach, thinly sliced (garnish)
In a large skillet, cook onions and chilies over medium high heat, in oil until soft and golden brown. About 6-8 minutes. Add garlic and spices and cook an additional 2 minutes. In a large bowl, add tomatoes and crush by hand. Add crushed tomatoes with sauce and tomato puree to the skillet. Cover and cook over medium high heat for a minimum of 1 hour. (The original recipe calls for a lot less cooking time but the tomatoes were too acidic for my taste so I cooked the sauce, covered for an hour in order to sweeten the tomatoes and blend the chilies and the sauce turned out fantastic!)
Add eggs, cover and heat an additional 8-10 minutes until the eggs are set but the yolks are still soft.
Top with feta and spinach and serve with pita bread. Enjoy!
Earlier this year, my best friend, Julie and I took a sushi class together. See our picture below...We had a blast and learned a lot. :)
 One reason we wanted to learn how to make sushi was so we could make it at home and save money. We both love sushi but, lets be honest, going out for sushi is super-duper expensive. If you eat sushi like my husband does, it's easily a hundred dollar dinner. So what better way to still be able to have Sushi Night, only on a budget, by making it at home.
Assembling sushi in the classroom with an instructor telling you what to do step-by-step and having all the ingredients at the ready is one thing, but doing it at home is something else entirely. It's not that it's difficult to make, the hardest part about sushi is
the preparation. There are a lot of ingredients that need to be prepared before you can begin. Veggies need to be cleaned and cut. Sauces need to be prepared. Tuna and Crab both need to be chopped, spiced and mixed to taste. And don't forget the most important ingredient in sushi, the rice. The rice needs to be cooked and cooled before it's sushi time! In our class, we learned that expert sushi chefs spend a whole year learning just about rice. That's
a long time to study one ingredient don't you think? So right away, my anxiety peaked about making sushi rice. I didn't want to make bad rice, since sushi
is--all about the rice.
 In an attempt to temper my anxiety, I did some homework and discovered that every recipe said to make it in a rice cooker. Needless to say, I didn't have a year
to kill over Sushi rice, so I followed the recipe instructions and
bought a rice cooker. I got a cheap one for $20 and it worked like a charm. My rice turned out great, sticky enough and
cooked perfectly.
Given that this was my first time making it all by my lonesome with no backup instructor talking me through, some
of my sushi didn't turn out all that great. Even though the rejects weren't pretty enough to make it to the photos, my husband and I ate them and they tasted
incredible.
I made the traditional Spicy Tuna roll and the
California roll, but got a little creative with my Green Veggie roll and
a version of an Ashley roll. A little sushi place near by makes an
Ashley roll with a Tempura fried Shrimp, spicy crab and jalapeno topped
with mango. It is one of my favorites. So because I didn't have large
shrimp to dip into tempura batter and fry up, I substituted it with a spicy salad of
small shrimp and crab. To mimic the crunch that would have come from the tempura I added toasted Panko flakes to the outside of the roll. I loved it. My husband however,
did not like the texture of the Panko. Oh well, you can't win them all. I
liked it though and that's what's important, right? Hehe!
Anyway here are some rather blurry in-progress pics. Sorry for the bad pictures. Enjoy!
In an attempt to temper my anxiety, I did some homework and discovered that every recipe said to make it in a rice cooker. Needless to say, I didn't have a year
to kill over Sushi rice, so I followed the recipe instructions and
bought a rice cooker. I got a cheap one for $20 and it worked like a charm. My rice turned out great, sticky enough and
cooked perfectly.
Given that this was my first time making it all by my lonesome with no backup instructor talking me through, some
of my sushi didn't turn out all that great. Even though the rejects weren't pretty enough to make it to the photos, my husband and I ate them and they tasted
incredible.
I made the traditional Spicy Tuna roll and the
California roll, but got a little creative with my Green Veggie roll and
a version of an Ashley roll. A little sushi place near by makes an
Ashley roll with a Tempura fried Shrimp, spicy crab and jalapeno topped
with mango. It is one of my favorites. So because I didn't have large
shrimp to dip into tempura batter and fry up, I substituted it with a spicy salad of
small shrimp and crab. To mimic the crunch that would have come from the tempura I added toasted Panko flakes to the outside of the roll. I loved it. My husband however,
did not like the texture of the Panko. Oh well, you can't win them all. I
liked it though and that's what's important, right? Hehe!
Anyway here are some rather blurry in-progress pics. Sorry for the bad pictures. Enjoy!
 Sushi Rice
3 cups sushi rice
3 cups water
3 T rice wine vinegar
2 T sugar
1 t salt
Add appropriate rice and water according to rice cooker directions and cook rice. Let the rice cool to for about 10 minutes. Dissolve sugar and salt in rice wine vinegar and then add to rice and mix well, cool to room temperature.
Spicy Tuna Roll
1/4 lb sashimi grade tuna
2-3 T garlic chili sauce
1 T mayonnaise
splash of soy sauce
Radish sprouts
Sushinori sheets
sushi rice
Sushi Rice
3 cups sushi rice
3 cups water
3 T rice wine vinegar
2 T sugar
1 t salt
Add appropriate rice and water according to rice cooker directions and cook rice. Let the rice cool to for about 10 minutes. Dissolve sugar and salt in rice wine vinegar and then add to rice and mix well, cool to room temperature.
Spicy Tuna Roll
1/4 lb sashimi grade tuna
2-3 T garlic chili sauce
1 T mayonnaise
splash of soy sauce
Radish sprouts
Sushinori sheets
sushi rice
Prepare tuna to desired spiciness. I like mine really spicy. But you can adjust to taste. Using wet hands spread a thin layer of rice over 3/4 of a sheet, leaving about an inch without rice at top of sheet. Add Spicy tuna and radish sprouts and roll beginning at the end with rice. Roll tightly. Use sushi mat to square off the roll and then cut using a very sharp knife.
California Roll
1 package Imitation Crab, chopped
2 T mayonnaise
cucumber, sliced
avocado, sliced
Sushinori sheets
rice
sesame seeds
Prepare Crab. Using wet hands, spread a layer of rice on the whole sheet. Sprinkle with sesame seeds and then flip the seaweed sheet with rice over, rice side down. Add crab mixture and layer cucumber and avocado next. Roll tightly and slice into bite size pieces. The California roll will have the rice on the outside.
Green Veggie Roll
asparagus spears
cucumber, sliced
avocado, sliced
jalapeno, strips
spicy mayonnaise (1/4 cup mayo+Sriracha to taste)
Sushinori sheets
rice
With wet hands, spread rice over 3/4 of the sheet leaving about one inch at the top of the roll with no rice. Add veggies and spicy mayo. Roll tightly and cut into bite sized pieces. I added a lot of the spicy mayo on this one, it was delicious but made for a sloppy looking roll. That being said, it was so good I left the pictures as is. :)
Ashley Roll (Lori's version)
 imitation crab, chopped
mini salad shrimp
2-3 T spicy mayonnaise
jalapeno, strips
Panko flakes, toasted
mango, sliced
hoisin sauce
Prepare crab and shrimp salad to desired spiciness. Toast panko flakes in a small skillet until lightly brown. Using wet hands, spread rice onto whole sheet. Sprinkle rice with toasted Panko flakes. Flip seaweed sheet with rice over. Rice side down. Fill roll with crab and shrimp salad and jalapeno slices. Roll tightly. Add sliced mango on top of roll and cover the top of the roll with plastic wrap. Using your sushi mat, round out the mango. Leaving the plastic wrap in place, cut into bite sized pieces. Remove plastic wrap and drizzle with hoisin sauce.
imitation crab, chopped
mini salad shrimp
2-3 T spicy mayonnaise
jalapeno, strips
Panko flakes, toasted
mango, sliced
hoisin sauce
Prepare crab and shrimp salad to desired spiciness. Toast panko flakes in a small skillet until lightly brown. Using wet hands, spread rice onto whole sheet. Sprinkle rice with toasted Panko flakes. Flip seaweed sheet with rice over. Rice side down. Fill roll with crab and shrimp salad and jalapeno slices. Roll tightly. Add sliced mango on top of roll and cover the top of the roll with plastic wrap. Using your sushi mat, round out the mango. Leaving the plastic wrap in place, cut into bite sized pieces. Remove plastic wrap and drizzle with hoisin sauce.


