Showing posts with label Holiday. Show all posts

Sunday, August 16, 2020

GHOUL AT HEART


CASTELLON'S KITCHEN IS MOVING...

I'm happy to announce my new website, ghoulatheart.com . After seven years of blogging my Halloween creations along side my regular recipes, I'm finally giving my Halloween recipes and decorating ideas the attention they deserve with a platform all its own. You'll see all new recipes and decorating ideas as well as some old favorites from Castellon's Kitchen and the best part is that you don't have to wait for fall for Halloween inspiration because I post them all year long. 

So, Halloween lovers rejoice and come visit me at Ghoul at Heart! And don't forget to hit the subscribe button to never miss out on a new post and follow Ghoul at Heart on social media to be the first to see  sneak peek photos of upcoming posts. 

Since you're here...Here's a peek at this year's Carn'evil' themed food and decorations. 

I Scream Cones

Slaw-ter Burgers

See you soon! 🎃

Lori

Tuesday, March 24, 2020

Slithering Salad (Spicy Cucumber Salad)

Spicy Cucumber Salad for Halloween

One of the bright sides to all this 'Stay at Home' time here in California, besides helping curb the infection rate of the COVID-19 virus, is that being at home with nowhere to go has got me tinkering in the kitchen again. No more obligations to distract me from playing around with my Halloween ideas. Last year, I missed blogging my Summer of Halloween recipes so this year, I'm determined to get an early start. Armed with lots of time on my hands and lots of ideas, here's a super simple idea that comes together quick and easy. 

An idea inspired by the cucumber salads served at Japanese restaurants and Sushi places. Cool, crisp cucumbers drizzled in a light soy sesame dressing...it's one of my favorite sides to have with sushi. I spiralized the cucumbers, kicked up the dressing with garlic chili sauce for heat, and added fun plating that turned a simple salad of cucumbers into a dramatic, delicious and festive Halloween recipe.  Stay safe my friends. 

(🎃221 days until Halloween...in case you're wondering🎃)


Halloween Food

Slithering Salad (Spicy Cucumber Salad)

Serves 4-6

Spicy Dressing

2 1/2 T rice wine vinegar
1-2 T garlic chili sauce (to taste)
1 T soy sauce
1 T sesame oil
1 T honey
1 t. fresh ginger, finely grated

3 English cucumbers

2 juniper berries or whole allspice berries (snake eyes)
Black sesame seeds (garnish)

Prepare dressing. Mix all ingredients in a small bowl and set aside. 


Spiralize the cucumbers:

Use straight cucumbers to get the best results.  

Select the head and tail cucumbers for your snake. Choose a cucumber that has a tapered narrow end to be the tail of your snake, and choose a cucumber that has a long piece of vine attached to it to make the best snake head with his tongue hanging out. The third cucumber will be to lengthen your snake and bridge between the head and tail sections. 

Head cucumber: On the non-vine end of the cucumber, thread a bamboo skewer through the center of the cucumber lengthwise leaving enough of the skewer exposed so you can pull it out later. I left about an inch and a half. This photo below shows a much longer section of the skewer as it was an in progress pic, but the amount of skewer exposed will depend on how big your cucumbers are to begin with.  

Place your threaded cucumber down on the cutting board, and with your knife at about a 45 degree angle, slowly rotate the cucumber as you cut down to the skewer, creating a continuous spiral around the skewer that holds everything in place. 

Adjust as you go. Your cuts will not be even all the way around due to the variation of the cucumbers and how centered your skewer is inside, but don't worry too much about it. Once the cuts are done, the variations of the spirals will hardly be noticeable. 

Continue cutting the spirals until you are about 4 inches from the tip of your snakes tongue. You don't want to cut spirals all the way into his head. Remove the bamboo skewer to release your snake coils. 


Snake eyes: Use the end of a skewer to poke eye holes in the cucumber on opposite sides of the head and then press juniper berries into the eye holes.  If you can't find juniper berries, substitute with whole allspice berries. Trim the tongue if needed.


Once you finish with your "snake head", repeat the spiraling with the tail cucumber. For the tail portion, thread the skewer starting at the tapered narrow end and begin spiraling at the narrow tail end until you reach the the end of the threaded bamboo skewer and trim off any excess unspiraled cucumber. Remove the skewer carefully releasing the coils and set aside. Repeat spiraling with the third cucumber and trim both round ends off the cucumber.  The picture below shows the untrimmed ends of the head and tail sections of spiralized cucumbers.

Arrange snake sections on a serving platter and drizzle with spicy dressing, garnish with black sesame seeds. Slice and serve immediately. 

More Halloween recipes to try:
Witchy Finger Food (Blistered Shishito Peppers)

Easy Halloween Kabobs 

Roasted Zombie Brain

Tuesday, January 7, 2020

Apple Cinnamon Donut Cakes


Happy New Year! It's a new year and another opportunity to make a fresh start. I don't usually make resolutions, rather I use the new year to set some intentions and put together my to do list for the year. Number one on my list this year will be to dive back into blogging. I took a little bit of a break from blogging in 2019 as you might have noticed. I spent the year reassessing, refocusing and recovering from 3 surgeries after an abnormal mammogram last May. I'm all recovered and ready to jump back into my creative space of food and fun Halloween ideas and projects. But before I get ahead of myself and dive right into Halloween, I have a 'better late than never' recipe to share. I made them before Christmas and never got around to posting them. So these Apple Cinnamon Donut Cakes are my first post of 2020. A delicious cinnamon sugar coated, 3 bite morsel of apple cinnamon cake! Make a batch. Invite your girlfriends over for coffee, cake and conversation to kick off the new year! Enjoy!

Apple Cinnamon Donut Cakes

Makes ~2 dozen

3 cups all purpose flour
1 1/2 t. baking powder
1/2 t. baking soda
1 T. cinnamon
1 t. nutmeg
1/4 t. cardamom
1 t. salt
1 cup brown sugar, packed
1/2 cup granulated sugar
1 cup apple cider
1 cup applesauce
3/4 cup olive oil or canola oil
3 t. vanilla extract
3 eggs
1/2 cup butter melted
1 cup granulated sugar
2 t. cinnamon
1/2 t. nutmeg

Preheat oven to 350 degrees

In a large bowl, combine flour, baking powder, baking soda, cinnamon, nutmeg, cardamom, and salt. Set aside. 
In a medium bowl, combine sugars, apple cider, applesauce, olive oil, vanilla extract, and eggs and whisk until mixed. Combine wet and dry ingredients and whisk until incorporated. Spray mini bundt cake pan with baking spray. Using a medium cookie scoop, fill mini bundt cakes half full, taking care not to overfill. Bake at 350 degrees for about 10-12 minutes. Let cool 10 minutes and then turn out of pan. Cool completely on a wire rack.  
Prepare cinnamon sugar. Combine sugar, cinnamon and nutmeg in a small bowl and mix. In a small bowl, melt butter in the microwave. 
Brush donut cakes with melted butter and then roll them in cinnamon sugar until completely coated. Serve. Store covered at room temperature for up to 2 days.
Other dessert recipes to try:

Red Velvet Brownies with Cookie Crumble Frosting
Gingerbread Spritz Cookies
Gingerbread Petits Fours with Cinnamon Buttercream

Wednesday, November 20, 2019

Blood Orange Upside-Down Cake


Is it too early for citrus season? I know apples, root vegetables, and squash are front and center all fall long, but I just couldn't wait any longer to share this delicious Blood Orange Upside-Down Cake. All the bright citrus sweetness of oranges, hints of cinnamon and a sweet dense orange cake soaked with a blood orange simple syrup and the juice from the baked fruit. Utterly delicious and oh so comforting to get you through the cold winter...fall months. It's perfect right out of the oven with a scoop of vanilla ice cream or all by itself with a cup of coffee.  
Note: Blood orange season is pretty short and not every grocery store will carry them. Not to worry if you can't find blood oranges, you can substitute with regular or Mardarin oranges. But, if you are lucky enough to find blood oranges in the market, grab a few bags. Use the first bag to make this cake and the second bag to freeze the zest and juice so you can use the zest and juice well beyond the cold winter months. Enjoy!

Blood Orange Upside Down Cake

Simple Syrup
1 cup blood orange juice
2-3 cinnamon sticks
1 cup sugar

Place blood orange juice and cinnamon sticks in a small saucepan and heat until reduced by half. Add sugar  and heat on low until sugar is completely dissolved and thickened about 4-5 minutes. Let cool and reserve cinnamon sticks. Strain syrup in a fine mesh strainer to remove fruit pulp. Return cinnamon sticks to strained syrup and set aside. (Photo note: I added star anise the first time I made this, but preferred not to include it in the next few attempts, unfortunately I did not take new pics without the star anise)

Cake Batter
3/4 cup butter
1 cup sugar
3 eggs
1 t. vanilla extract
3 t milk
zest of 3 oranges
1 1/4 cup all purpose flour
1 1/2 t. baking powder
1/2 t. salt
6-8 small blood oranges, peeled and sliced into 1/4 inch slices

Preheat oven to 350 degrees.


Prepare simple syrup as directed above. 

Cream butter and sugar until fluffy. Add eggs one at a time. Add vanilla extract and milk and beat until incorporated.  Add orange zest. Add flour, baking powder and salt and set aside.

Spray a 8" cake pan with cooking spray and then line the bottom of the pan with an 8" parchment paper circle, taking care to smooth out the parchment to remove all bubbles underneath the parchment. 

Add blood orange syrup and cinnamon sticks to the parchment lined cake pan. Next, layer blood orange slices over the syrup and cinnamon sticks. 

Then, pour cake batter over the orange slices and smooth over the top with a rubber spatula to level the batter. The batter will be thick.

Bake at 350 degrees for 40 minutes. At 20 minutes, place a piece of foil sprayed with cooking spray over the top of the cake, to prevent over browning. Let bake the remaining 20 minutes. Remove from oven and let cool for about 10-15 minutes. 
Run a knife around the edge of the pan and then place a serving plate over the cake pan. Flip the pan and plate over together to remove the upside down cake from the cake pan.  Serve warm with a side of ice cream or all by itself. Enjoy!

Other dessert recipes to try:

Orange Cornmeal Cake

Pumpkin Pie Cupcakes
Rustic Apple Torta
Gingerbread Petits Fours with Cinnamon Buttercream

Tuesday, October 15, 2019

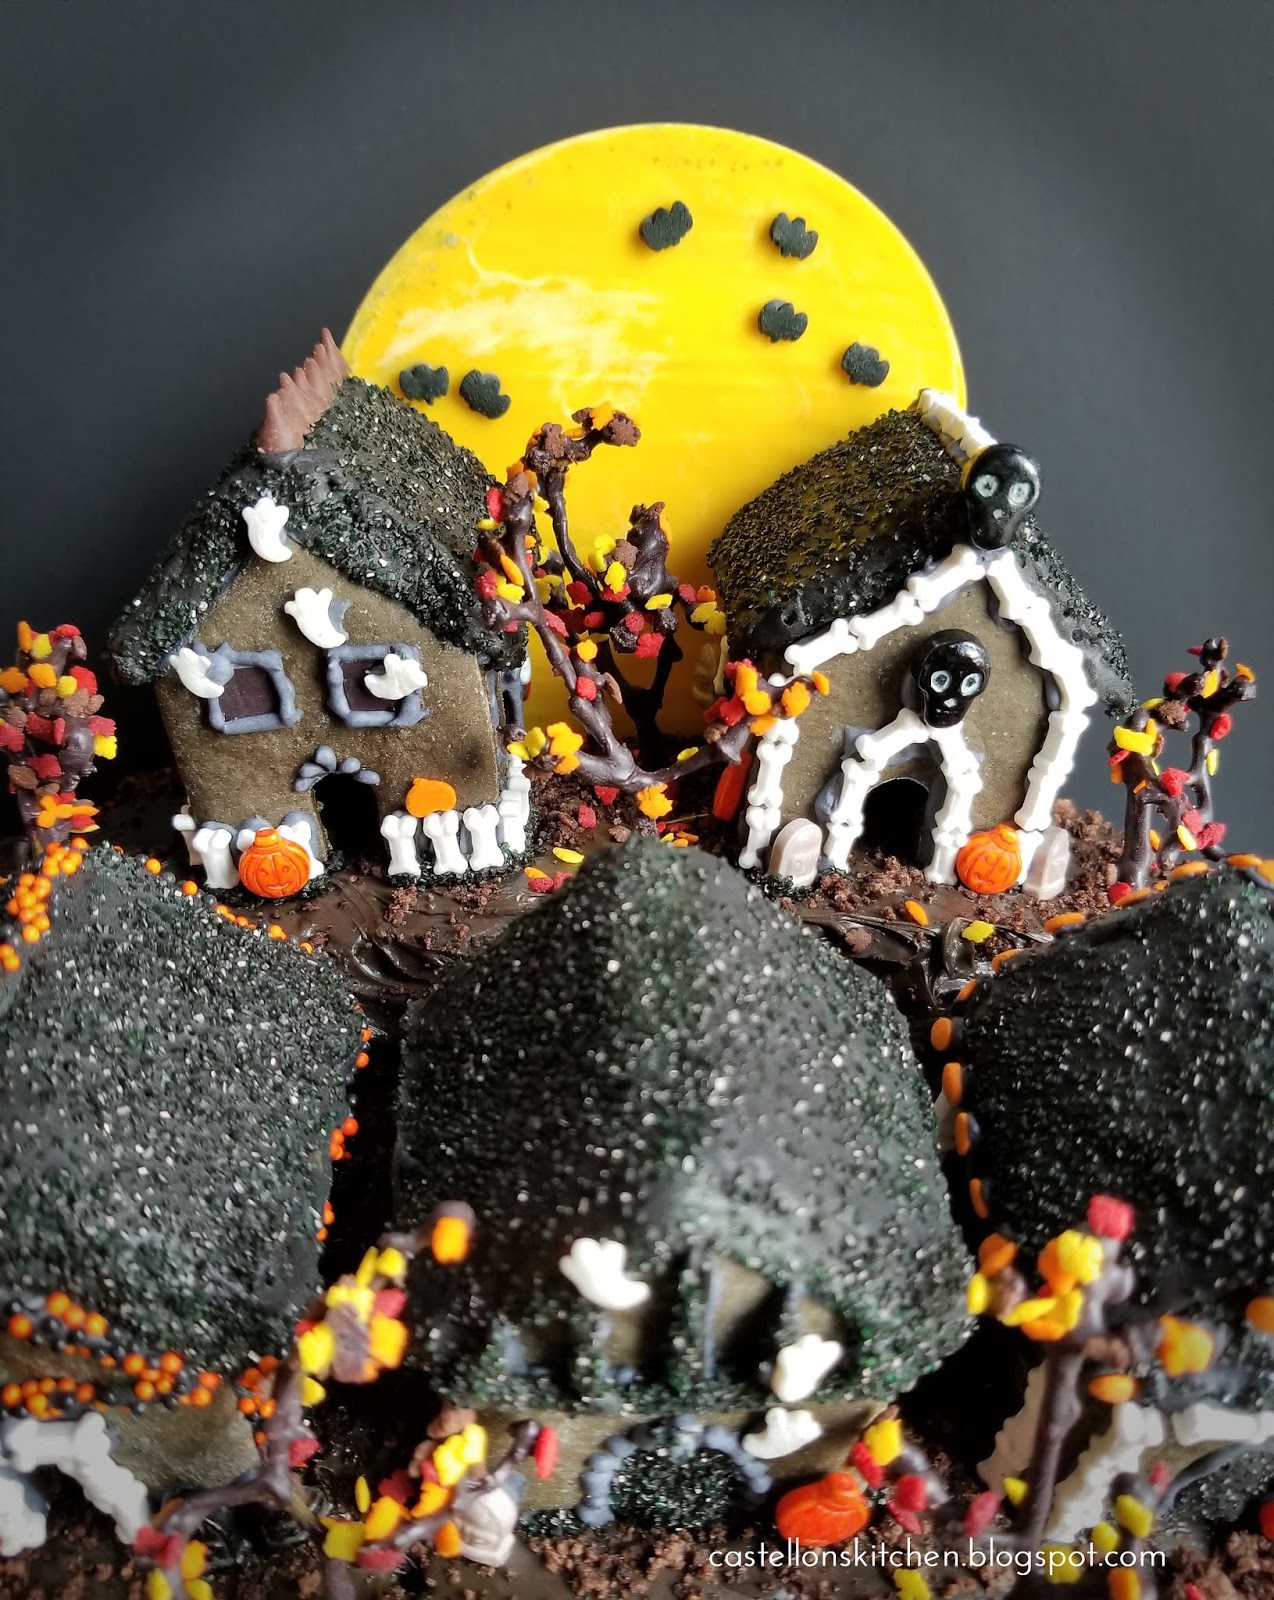
Haunted Gingerbread Cake Topper


OK, so it's been almost a year since I've blogged. My absence was partially because I was working on moving my blog to a website at castellonskitchen.com, but I realized that I needed a lot more work done on it. Work that I needed to pay someone to do. So I've put it off. But the biggest reason for my absence, was that I had some issues with my last mammogram in April which led to a diagnostic mammogram to look at the area of calcification in my left breast. That then led to a biopsy to get a look at he cells from that area. Biopsy Result: Atypical Lobular Hyperplasia. The good news was that it was not cancer. However, the presence of these cellular changes indicated increased risk of developing breast cancer in that breast. 
So the first step was to remove the area of calcification. So in June, I had surgery (lumpectomy) to remove the 2 inch area of calcification. Result: Pathology report revealed that there was no healthy margin of cells present in the removed tissue. Translation: We didn't get it all. 
The next step was to review my options. Since it wasn't cancer, I had time to decide. My options were to begin hormone treatments to reduce risk along with increased mammogram screenings. Which, in my mind, that meant waiting for it to turn into cancer. The other option was to remove the breast. After consultation with my doctors and my husband, I decided to have the mastectomy to remove my left breast. I had a mastectomy 4 weeks ago and I'll undergo reconstruction in December. For me, it was the right decision and the pathology report validated it. The pathology report on the removed breast showed extensive atypical lobular hyerplasia and lobular carcinoma in situ throughout the breast. I can't help but think that if I had taken "the wait and see approach" and waited another 6 months to the next screening, I might have gotten a very different result. So the moral of my story is that I caught these changes in my breast tissue early through regular mammogram screenings. If you are weary about getting your mammograms each year, I know they are not the most comfortable things to get, but don't wait. Not only is October the happiest time of year for this Halloween-loving gal, it's also Breast Cancer Awareness Month, so use this time of heightened awareness to schedule your mammogram today! 


With these health concerns dominating my energies, I missed my annual Summer of Halloween this year which was a total bummer! But not to worry, I have this fun little recipe to get the Halloween juices flowing, even if it's a little later than usual. Reward all your efforts in self-care and do something fun! Pull out your stash of Halloween sprinkles and make this adorable Halloween Gingerbread Cake Topper! 🎃 Happy Halloween!

P.S. I must confess that I actually made these haunted Gingerbread houses at Christmastime last year after being inspired by a Mini Gingerbread Cookie Cutter I purchased from Cost Plus World Market. Since it's not Christmas, you can pick one up here to make your Halloween Houses. 


Haunted Gingerbread Houses

1 stick butter 
1/2 c brown sugar
1 cup molasses
2 eggs
Black gel food coloring (to desired darkness)
4 cups flour plus more as needed
1/2 tsp baking soda
1/2 tsp salt
2 T cloves
2 T cinnamon
2 T ginger


Royal Icing with added black food coloring
Betty Crocker® cookie icing, black
Black sugar 
Various Halloween sprinkles (tombstones, pumpkins, bats, bones. eyeballs and ghosts) 
Yellow Candy Melts (moon)  
Favorite box Cake and chocolate frosting
Crushed chocolate sandwich cookies 
Chocolate rocks, black          

Preheat oven to 350 degrees.  

Cream the butter and sugar.  Add molasses and eggs and black food coloring. Add dry ingredients and mix until incorporated. Turn out on floured surface and add more flour until dough is not sticky. Portion out dough into small balls that can be rolled out to 1/8" thickness and to the dimensions that fit the cookie cutter.  Place individually rolled dough on parchment lined cookie sheet and cut out gingerbread houses with floured cutter on the cookie sheet. Remove excess dough. Bake in a 350 degree oven for 10 minutes and cool.

Royal Icing

2 cups powdered sugar, sifted
1.5 T meringue powder
1-2 T water (to desired consistency)
Black gel food coloring

Add sugar and meringue power into a bowl and add 1 T of water and black food coloring and mix until you reach a stiff consistency that remains fluid enough to pipe but not drip. Add additional water and/or food coloring until desired results.  If too thin add more sugar. Spoon icing into a piping bag or bottle with piping tip. 

Begin assembling your cookie cutter gingerbread houses with royal icing and letting the royal icing dry completely. 
I used Betty Crocker® cookie icing in black to color the roof and then sprinkled it black sugar while still wet and let it dry to a hard icing. Use your imagination to attach Halloween sprinkles to decorate each house. 
Grape Stem Trees
For the trees, I cut off small branches of grape stems and coated them in melted chocolate and sprinkled with micro mini fall leaves while the chocolate was still wet. 

Candy Full Moon
The full moon is made by tracing around a large round cookie cutter on parchment paper to use as a guide when pouring your melted yellow candy melts to create your moon. Spread candy melts over the parchment circle overlapping the line just a bit. While the chocolate is cooled, but not yet hardened, use the same cookie cutter to cut a clean edged circle of yellow candy melts. Leave candy moon on the parchment to cool completely. Use royal icing to attach small bat sprinkles to the full moon. Set aside.  

Prepare Cake
Prepare box cake batter according to box instructions or make your favorite homemade cake. Pour 3/4 cup of batter into a prepared mini loaf pan. This small loaf will be used to make a raised tier for the two houses in the background. Pour the remaining cake batter into two prepared 8" cake rounds and bake the rounds according to package directions using the lower time in the range given on the instructions. Check for doneness, bake longer as needed. Bake the loaf pan for about 10-15 minutes, keeping an eye on it so it doesn't burn.  Let cool completely. 
Frost two layers of the cake and then add the mini loaf to the back half of the top of the cake. Test placement of the two background houses. If placement looks good. Frost rest of the cake. Crumble about 6 chocolate sandwich cookies in a food processor and sprinkle cake with cookie crumbles. 

Assemble your Haunted Hamlet
Add three houses to the foreground and two the the background. Use royal icing to attach the full moon to the backs of the two background houses for stability Add grape stem trees and tombstones and sprinkle micro leaves under trees until you reach your desired look.  I added black chocolate rocks to the base of the cake but if you can't find them, use your crushed cookies instead. 

Other Halloween recipes to try: