Tuesday, March 24, 2020

Slithering Salad (Spicy Cucumber Salad)

Spicy Cucumber Salad for Halloween

One of the bright sides to all this 'Stay at Home' time here in California, besides helping curb the infection rate of the COVID-19 virus, is that being at home with nowhere to go has got me tinkering in the kitchen again. No more obligations to distract me from playing around with my Halloween ideas. Last year, I missed blogging my Summer of Halloween recipes so this year, I'm determined to get an early start. Armed with lots of time on my hands and lots of ideas, here's a super simple idea that comes together quick and easy. 

An idea inspired by the cucumber salads served at Japanese restaurants and Sushi places. Cool, crisp cucumbers drizzled in a light soy sesame dressing...it's one of my favorite sides to have with sushi. I spiralized the cucumbers, kicked up the dressing with garlic chili sauce for heat, and added fun plating that turned a simple salad of cucumbers into a dramatic, delicious and festive Halloween recipe.  Stay safe my friends. 

(🎃221 days until Halloween...in case you're wondering🎃)


Halloween Food

Slithering Salad (Spicy Cucumber Salad)

Serves 4-6

Spicy Dressing

2 1/2 T rice wine vinegar
1-2 T garlic chili sauce (to taste)
1 T soy sauce
1 T sesame oil
1 T honey
1 t. fresh ginger, finely grated

3 English cucumbers

2 juniper berries or whole allspice berries (snake eyes)
Black sesame seeds (garnish)

Prepare dressing. Mix all ingredients in a small bowl and set aside. 


Spiralize the cucumbers:

Use straight cucumbers to get the best results.  

Select the head and tail cucumbers for your snake. Choose a cucumber that has a tapered narrow end to be the tail of your snake, and choose a cucumber that has a long piece of vine attached to it to make the best snake head with his tongue hanging out. The third cucumber will be to lengthen your snake and bridge between the head and tail sections. 

Head cucumber: On the non-vine end of the cucumber, thread a bamboo skewer through the center of the cucumber lengthwise leaving enough of the skewer exposed so you can pull it out later. I left about an inch and a half. This photo below shows a much longer section of the skewer as it was an in progress pic, but the amount of skewer exposed will depend on how big your cucumbers are to begin with.  

Place your threaded cucumber down on the cutting board, and with your knife at about a 45 degree angle, slowly rotate the cucumber as you cut down to the skewer, creating a continuous spiral around the skewer that holds everything in place. 

Adjust as you go. Your cuts will not be even all the way around due to the variation of the cucumbers and how centered your skewer is inside, but don't worry too much about it. Once the cuts are done, the variations of the spirals will hardly be noticeable. 

Continue cutting the spirals until you are about 4 inches from the tip of your snakes tongue. You don't want to cut spirals all the way into his head. Remove the bamboo skewer to release your snake coils. 


Snake eyes: Use the end of a skewer to poke eye holes in the cucumber on opposite sides of the head and then press juniper berries into the eye holes.  If you can't find juniper berries, substitute with whole allspice berries. Trim the tongue if needed.


Once you finish with your "snake head", repeat the spiraling with the tail cucumber. For the tail portion, thread the skewer starting at the tapered narrow end and begin spiraling at the narrow tail end until you reach the the end of the threaded bamboo skewer and trim off any excess unspiraled cucumber. Remove the skewer carefully releasing the coils and set aside. Repeat spiraling with the third cucumber and trim both round ends off the cucumber.  The picture below shows the untrimmed ends of the head and tail sections of spiralized cucumbers.

Arrange snake sections on a serving platter and drizzle with spicy dressing, garnish with black sesame seeds. Slice and serve immediately. 

More Halloween recipes to try:
Witchy Finger Food (Blistered Shishito Peppers)

Easy Halloween Kabobs 

Roasted Zombie Brain

Wednesday, March 18, 2020

'Let Nature Run Its Corpse' Cakes

Halloween Cupcakes

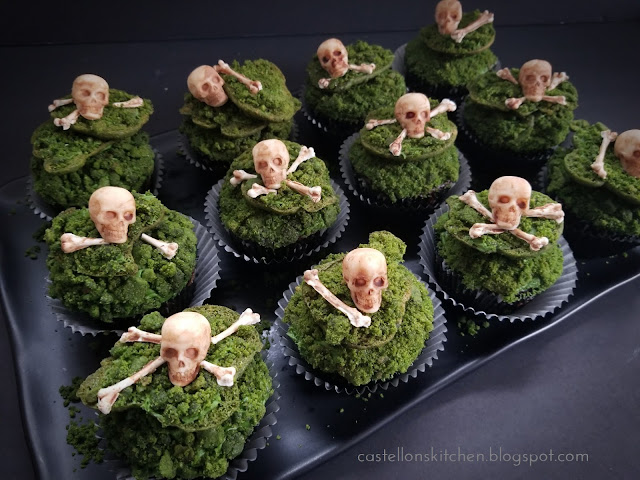
After missing all of last year's "Summer of Halloween" because of a health issue, I'm starting extra early this year on my Halloween recipes and decorating ideas.  I realize it's only March, but some of my Halloween ideas have been inspired by other holidays. For instance, my Haunted Hamlet was inspired by Mini Christmas Villages, my Halloween Topiaries were created by transforming Christmas Angels, and My Bloody Valentine Cake inspired by... of course Valentine's day.  These festive cupcakes that I like to call, Let Nature Run Its Corpse Cakes were inspired by all the mossy Spring/Easter pins all over Pinterest right now. Seeing all the bunnies and eggs cushioned in baskets of moss, I took it another direction all together...instead I went with aged skull and crossbones put to rest in shallow mossy graves. ☠ I think they're absolutely perfect for Halloween, don't you? 
Halloween cupcakes

The faux moss looks so realistic that it's hard to believe that these cupcakes are edible. Creating the faux moss-look was super simple. I added a few drops of moss colored food coloring to ready made sugar cookie dough and baked as usual. Crumble half of the cookies and sprinkle the underside of the whole cookies with the cookie crumbs to give you faux moss covered cookies. I topped them with aged white chocolate skulls and crossbones that I made with mini molds purchased from Etsy. I've included the links below.  

These little gems are the perfect recipe to kick off my Organic Halloween theme this year. All my Halloween food and decorating ideas will center around all things green, black with natural organic elements like moss and ferns, twigs and wood. It's going to be so much fun...Stay tuned for more Halloween ideas coming all spring and summer long. 

Let Nature Run Its Corpse Cakes 

Makes 24 cupcakes

Make ahead:
Chocolate Skull and Bones
1 package melting white chocolate 
1/2 t. cocoa powder 
1 T vodka
Mini Skull mold by StaceyDecor 
Mini Bone mold by Moldcreationsnmore 

Melt chocolate according to package directions and transfer into a piping bag or a plastic ziplock bag with the corner cut off.  Pipe melted chocolate into molds and tap the bottom of the molds on counter to settle chocolate and remove air bubbles and empty space.  Place filled molds in the refrigerator and let set for 15 minutes or longer as needed. Remove skull and bones from the molds and set aside. Don't worry if the small crossbones break, they can still be used with the skulls. Repeat until you have 24 skulls and 48 bones.
Aging bonesIn a small bowl, add 1 tsp. cocoa and 1T vodka and mix until combined. Use a paint brush to paint the chocolate skulls and bones with the cocoa vodka mixture to age the bones. The vodka will evaporate and leave the cocoa behind creating an aged look of the bones. Set aside until ready to use. 


Mossy Cupcakes 
1 box chocolate cake mix
1 can prepared vanilla frosting
1 tube prepared sugar cookie dough, room temperature
moss green gel food coloring
black cupcake liners

Cupcakes: Prepare cupcakes according to package directions. Cool completely.
Frosting: Combine ~1/4 tsp. of moss green gel food coloring to vanilla frosting and mix well. Set aside.
Cookies: Place prepared cookie dough in a medium bowl and add about 1/2 tsp. moss green gel food coloring and mix until well combined. 


Scoop about 1 tsp of cookie dough onto a parchment lined cookie sheet. Use a fork or a butter knife to press dough flat into irregular shapes. 


Bake for 10 minutes at 350 degrees. Cookies will have slightly brown bottom which is what you want to add depth of color to your mossy cookies.  Cool cookies and set aside 30 small cookies to top your cupcakes with. Crumble the remaining cookies or the larger cookies into a medium bowl and set aside. This will be used to top your cupcake frosting and to add mossy texture to the sugar cookie topper. 

Assemble: Frost cupcakes and dip frosting side down into crumbled cookies to create the mossy top of the cupcake. Next, lightly frost the bottom side of a sugar cookie. Now place a small dollop of frosting on the other side of the cookie to act as a glue to hold the cookie to the top of the cupcake. Now sprinkle crumbs over the slightly frosted cookie bottom to complete the mossy look. 


Garnish: Top with skull and crossbones secure with a small dab of frosting. 

More Halloween Dessert Ideas:

Jack-o-lantern Cupcakes
Bad Moon Rising Cheesecake
My Bloody Valentine
Haunted House Cake Topper