Saturday, October 19, 2019

Easy Halloween Kabobs

I'm on a roll with easy Halloween appetizers. Yesterday, I posted an easy recipe idea for Witchy Finger Food (Blistered Shishito Peppers with Sesame Soy Sauce) and today, these simple and festive Halloween Kabobs.  I'm rolling through Easytown this year because I missed my annual Summer of Halloween. If you're wondering what the heck is "Summer of Halloween"? It is the most wonderful time of the year for this gal who plans Halloween dishes all year. When everyone else is basking in the summer heat and splashing around in pools, I'm up to my eyeballs in Halloween projects, decorating and cooking up fun Halloween dishes. Unfortunately, a health issue kept me from my annual frenzy, but I'm all better now and back in the kitchen scrambling to get a few of my summer Halloween ideas together to share. 🎃 So, I'm picking ones that are quick and easy to put together and what could be simpler than fruit and veggie kabobs? 
Haha! Don't be a smart Alec....I heard you say, "a fruit and veggie tray!" 
Yes, a fruit and veggie tray would be simpler, but this platter is much more beautiful and way more fun to eat! Plus this yumminess comes with dipping sauces! The basic fruit tray doesn't come with dipping sauce... Imagine taking these beauties to a Halloween potluck!  Impress everyone with your melon balling and knife skills...It'll be so worth the extra effort to thread these onto fun picks.  By the way, if your'e wondering, I got these super cute and festive 5" Orange Skull picks online from Pick On Us.

I used traditional Orange and Black for this platter but feel free to use any color combination that screams Halloween to you.  Do all fruit kabobs, or all veggies, the choice is yours.  Happy Halloween!

Easy Halloween Kabobs


Black Fruits (Grapes, Blackberries, Figs)
White Fruit (Dragon fruit,Jicama, Guava, Lychee, Mangosteen)
Orange Fruit (Cantaloupe, Mango, Persimmon, Mandarin Orange) 

Black Olives
1 container Fresh Mozzarella balls (substitute with your favorite soft/semi-soft cheese, cubed)
1 container Orange Cherry Tomatoes

Mango Dipping Sauce
1 mango, peeled and pureed in a food processor.

Balsamic Glaze
1 cup balsamic vinegar, reduced to 1/3 cup
honey (to taste)

Over medium heat, reduce the balsamic vinegar to about 1/3 cup. Cool and add honey to taste.

5" orange skull picks from Pick On Us. 

Cut up desired fruits and thread onto picks or small skewers and serve with mango dipping sauce. Thread desired cheese, olives and tomatoes onto picks or small skewers and serve with balsamic glaze dipping sauce. 
Easy breezy! Enjoy!

Other Halloween recipes to try:
Abracadabra Platter (Purple Crudite and Cheese Tray)
Antipasto de los Muertos
Bloody Eyeball Bruschetta

Friday, October 18, 2019

Witchy Finger Food (Blistered Shishito Peppers with Sesame Soy Sauce)

So I made these deliciously gruesome morsels yesterday after a long hiatus from my kitchen. I had this particular idea in my head all summer and I finally got to toy around with it and it totally paid off!  Not only do these creepy digits look the Halloween part, they taste amazing, and they're really simple to make. 
OK, I'll admit that there is a little prep work in applying the almond fingernails, but you really don't have to add them if you don't want to go to all the trouble.  Shishito peppers already look like gnarly witches fingers all by themselves. But if you're looking for a bit of realism, add the sliced almond fingernails and give them a few minutes in the oven, the almonds will brown which adds to the festive look. Add these to your Halloween buffet to feed a crowd or include them in a Halloween Dinner as a side dish to my Midnight Sushi with Wasabi Skulls made with black rice. Enjoy! 


Witchy Finger Food (Blistered Shishito Peppers with Sesame Soy Sauce)

Serves 4-6

Sesame Soy Dipping Sauce
1/4 c. low sodium soy sauce
1 T toasted sesame oil
1 T garlic chili sauce
~Mix all ingredients in a small bowl and set aside.

10-12 oz. Shishito peppers
Sliced Almonds
Black Sesame Seeds

Preheat oven to 400 degrees.
Cut off a small tip of the shishito pepper at an angle to make a small opening  for the fingernail. Place a sliced almond to create the witches fingernail. Don't worry if it doesn't fit well, once the peppers are roasted, they'll be softer and the fingernails can be re-positioned. Some will fall out during baking as well and will need to be put back in.   
Place peppers on a parchment lined cookie sheet.  Baste peppers with a light coating of sesame soy dipping sauce. Bake in a 400 degree oven for 8-10 minutes. Let cool slightly, sprinkle generously with black sesame seeds and serve with remaining dipping sauce.

 Check out this perfectly creepy blistered witchy finger...looks yucky, tastes yummy! 🎃

Have fun with your plating. I used a small cauldron bowl and placed it on a skeleton hand I got from the 99 last year. I added my old silver sugar cube tongs with super cool claws as my serving utensil. It definitely looks the part of a festive Halloween snack ready to be devoured!

These fingers would be great paired with way cool Midnight Sushi with Wasabi Skulls, made with black rice and Eye of the Beholder Fruit Salad for dessert .

Tuesday, October 15, 2019

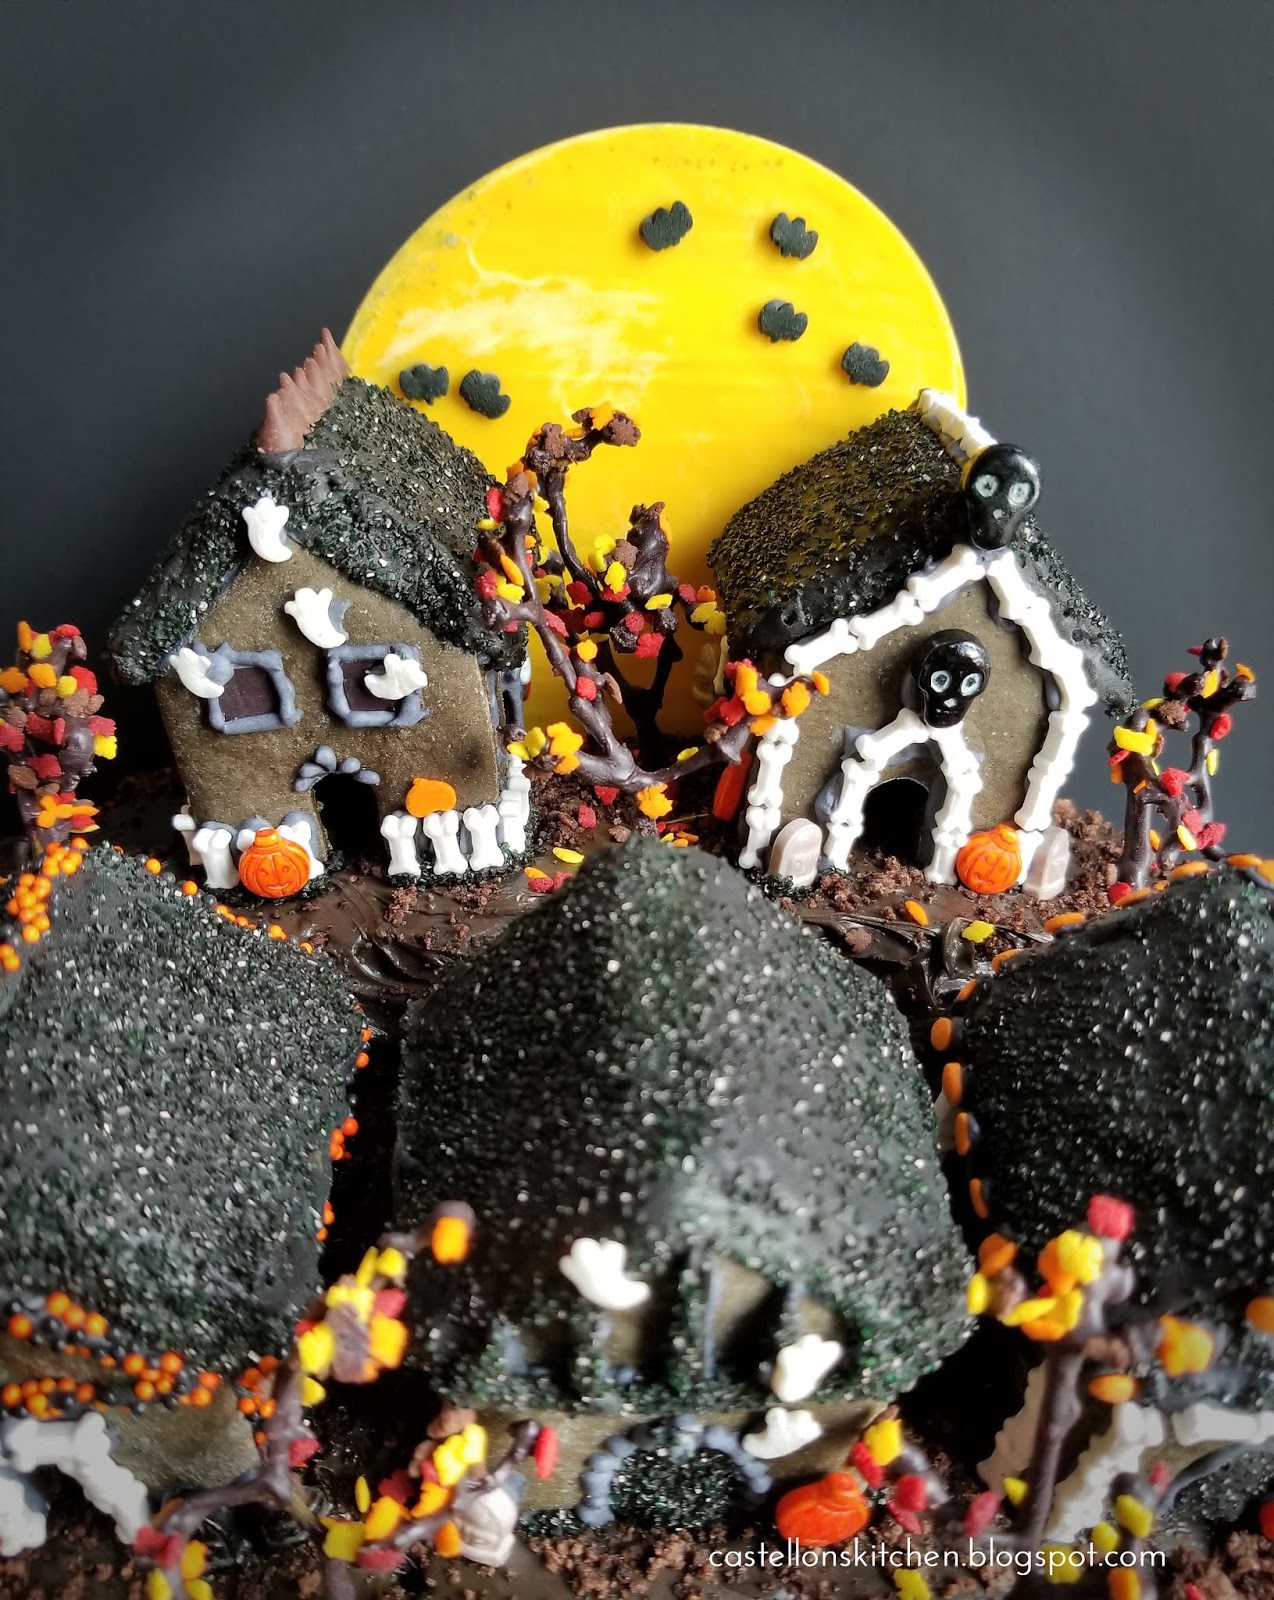
Haunted Gingerbread Cake Topper


OK, so it's been almost a year since I've blogged. My absence was partially because I was working on moving my blog to a website at castellonskitchen.com, but I realized that I needed a lot more work done on it. Work that I needed to pay someone to do. So I've put it off. But the biggest reason for my absence, was that I had some issues with my last mammogram in April which led to a diagnostic mammogram to look at the area of calcification in my left breast. That then led to a biopsy to get a look at he cells from that area. Biopsy Result: Atypical Lobular Hyperplasia. The good news was that it was not cancer. However, the presence of these cellular changes indicated increased risk of developing breast cancer in that breast. 
So the first step was to remove the area of calcification. So in June, I had surgery (lumpectomy) to remove the 2 inch area of calcification. Result: Pathology report revealed that there was no healthy margin of cells present in the removed tissue. Translation: We didn't get it all. 
The next step was to review my options. Since it wasn't cancer, I had time to decide. My options were to begin hormone treatments to reduce risk along with increased mammogram screenings. Which, in my mind, that meant waiting for it to turn into cancer. The other option was to remove the breast. After consultation with my doctors and my husband, I decided to have the mastectomy to remove my left breast. I had a mastectomy 4 weeks ago and I'll undergo reconstruction in December. For me, it was the right decision and the pathology report validated it. The pathology report on the removed breast showed extensive atypical lobular hyerplasia and lobular carcinoma in situ throughout the breast. I can't help but think that if I had taken "the wait and see approach" and waited another 6 months to the next screening, I might have gotten a very different result. So the moral of my story is that I caught these changes in my breast tissue early through regular mammogram screenings. If you are weary about getting your mammograms each year, I know they are not the most comfortable things to get, but don't wait. Not only is October the happiest time of year for this Halloween-loving gal, it's also Breast Cancer Awareness Month, so use this time of heightened awareness to schedule your mammogram today! 


With these health concerns dominating my energies, I missed my annual Summer of Halloween this year which was a total bummer! But not to worry, I have this fun little recipe to get the Halloween juices flowing, even if it's a little later than usual. Reward all your efforts in self-care and do something fun! Pull out your stash of Halloween sprinkles and make this adorable Halloween Gingerbread Cake Topper! 🎃 Happy Halloween!

P.S. I must confess that I actually made these haunted Gingerbread houses at Christmastime last year after being inspired by a Mini Gingerbread Cookie Cutter I purchased from Cost Plus World Market. Since it's not Christmas, you can pick one up here to make your Halloween Houses. 


Haunted Gingerbread Houses

1 stick butter 
1/2 c brown sugar
1 cup molasses
2 eggs
Black gel food coloring (to desired darkness)
4 cups flour plus more as needed
1/2 tsp baking soda
1/2 tsp salt
2 T cloves
2 T cinnamon
2 T ginger


Royal Icing with added black food coloring
Betty Crocker® cookie icing, black
Black sugar 
Various Halloween sprinkles (tombstones, pumpkins, bats, bones. eyeballs and ghosts) 
Yellow Candy Melts (moon)  
Favorite box Cake and chocolate frosting
Crushed chocolate sandwich cookies 
Chocolate rocks, black          

Preheat oven to 350 degrees.  

Cream the butter and sugar.  Add molasses and eggs and black food coloring. Add dry ingredients and mix until incorporated. Turn out on floured surface and add more flour until dough is not sticky. Portion out dough into small balls that can be rolled out to 1/8" thickness and to the dimensions that fit the cookie cutter.  Place individually rolled dough on parchment lined cookie sheet and cut out gingerbread houses with floured cutter on the cookie sheet. Remove excess dough. Bake in a 350 degree oven for 10 minutes and cool.

Royal Icing

2 cups powdered sugar, sifted
1.5 T meringue powder
1-2 T water (to desired consistency)
Black gel food coloring

Add sugar and meringue power into a bowl and add 1 T of water and black food coloring and mix until you reach a stiff consistency that remains fluid enough to pipe but not drip. Add additional water and/or food coloring until desired results.  If too thin add more sugar. Spoon icing into a piping bag or bottle with piping tip. 

Begin assembling your cookie cutter gingerbread houses with royal icing and letting the royal icing dry completely. 
I used Betty Crocker® cookie icing in black to color the roof and then sprinkled it black sugar while still wet and let it dry to a hard icing. Use your imagination to attach Halloween sprinkles to decorate each house. 
Grape Stem Trees
For the trees, I cut off small branches of grape stems and coated them in melted chocolate and sprinkled with micro mini fall leaves while the chocolate was still wet. 

Candy Full Moon
The full moon is made by tracing around a large round cookie cutter on parchment paper to use as a guide when pouring your melted yellow candy melts to create your moon. Spread candy melts over the parchment circle overlapping the line just a bit. While the chocolate is cooled, but not yet hardened, use the same cookie cutter to cut a clean edged circle of yellow candy melts. Leave candy moon on the parchment to cool completely. Use royal icing to attach small bat sprinkles to the full moon. Set aside.  

Prepare Cake
Prepare box cake batter according to box instructions or make your favorite homemade cake. Pour 3/4 cup of batter into a prepared mini loaf pan. This small loaf will be used to make a raised tier for the two houses in the background. Pour the remaining cake batter into two prepared 8" cake rounds and bake the rounds according to package directions using the lower time in the range given on the instructions. Check for doneness, bake longer as needed. Bake the loaf pan for about 10-15 minutes, keeping an eye on it so it doesn't burn.  Let cool completely. 
Frost two layers of the cake and then add the mini loaf to the back half of the top of the cake. Test placement of the two background houses. If placement looks good. Frost rest of the cake. Crumble about 6 chocolate sandwich cookies in a food processor and sprinkle cake with cookie crumbles. 

Assemble your Haunted Hamlet
Add three houses to the foreground and two the the background. Use royal icing to attach the full moon to the backs of the two background houses for stability Add grape stem trees and tombstones and sprinkle micro leaves under trees until you reach your desired look.  I added black chocolate rocks to the base of the cake but if you can't find them, use your crushed cookies instead. 

Other Halloween recipes to try:

Sunday, December 30, 2018

Pumpkin Challah Bread

I used to be able to pick up some Challah bread from my local farmers market every few weeks from one of my favorite bakers, Rob at Arising Dough. Unfortunately, he moved to another Farmers Market over a year ago and I regrettably I haven't made it over to visit his new market. (sigh.) In addition to his delicious sourdough bread, Rob makes Challah bread in all sorts of flavors and one of my favorite's is his Fall Spices Challah. It is absolutely divine. I came across this Pumpkin Challah bread recipe and it reminded me of his amazing bread and I decided to give it a try. The added pumpkin puree makes this already soft bread extra moist and soft but still dense enough to hold up to butter and jam or even soaking overnight in eggs and cream to make the most amazing French Toast. I personally like it with butter and a sprinkle of cinnamon sugar and a cup of coffee, but I also made some curried croutons with it to top salads and soups! Absolutely perfect, but next time, I'll forgo bread making and go get the original from Arising Dough. Happy Holidays!

Pumpkin Challah Bread

Recipe from Taste of Home Pumpkin Cookbook

1 pkg (1/4oz.) active dry yeast
3 T warm water (110-115 degrees)
1/2 cup canned pumpkin
1 large egg
2 T brown sugar
2 T softened butter
1 t. pumpkin pie spice
1/2 t. salt
2-2 1/2 cups bread flour

Egg wash
1 egg + 1 T water

In a small bowl, dissolve yeast in warm water. In a large bowl, combine pumpkin. egg. brown sugar, pie spice, salt, yeast mixture and 1 cup flour. Beat on medium speed until smooth. Stir in enough remaining flour to form a soft dough. It will be a bit sticky.
Turn dough on a floured surface and knead dough until smooth and elastic, about 6-8 minutes. 
Place in a greased bowl, turning once to grease the top. Cover with plastic wrap and let rise in a warm place until doubled. About an hour. 


Punch down dough. Turn onto a lightly floured surface, divide into thirds. Roll each into a 16-inch rope.  PLace ropes on a parchment-lined cookie sheet and braid. 


Pinch ends to seal and tuck under. Cover with a kitchen towel;let rise in a warm place until almost doubled, about 45 minutes. 

Preheat oven to 350 degrees.
Prepare egg wash by mixing water and egg in a small bowl. Brush over loaf. Bake 20-25 minutes or until golden brown. Remove from pan to a wire rack to cool.

Other recipes to try:
Garlic Cheese Bread
French Bread
Pumpkin Crumb Muffins

Wednesday, December 5, 2018

Cranberry Bruschetta

Cranberry Sauce is the last of our Thanksgiving leftovers. Aside from topping leftover turkey sandwiches or riding shotgun to sliced turkey on Thanksgiving day. It's great on toast or muffins on post-holiday mornings. It's basically jam afterall. I decided to elevate the humble toast with jam to these easy and deliciously sweet Cranberry Bruschetta. 
Inspired by an old Pampered Chef recipe for Strawberry Bruschetta, I dug up my scalloped bread tube and baked up a loaf of this beautiful bread that was toasted crisp with butter and cinnamon sugar. I slathered it with a sweetened creamy mascarpone cheese generously flavored with lemon zest and then  topped with cinnamon cranberry sauce, more lemon zest, and finely minced rosemary. Perfect for a light breakfast or dessert!  Enjoy!

Cranberry Bruschetta


Makes ~20

french baguette, sliced*
butter
3 T cinnamon sugar
1 cup Mascarpone cheese
1/4 cup powdered sugar, sifted
zest of 1 lemon and 1 T lemon juice
1/4 cup sliced almonds
1 cup leftover homemade cranberry sauce 
1/4 t cinnamon
1/2 t fresh rosemary, finely minced (garnish)
lemon zest (garnish)


Butter baguette slices and sprinkle with cinnamon sugar. Place bread slices on cookie sheet and broil until toasted ~ 4minutes. Set aside to cool. 

*Note: I used my Pampered Chef Scalloped Bread Tube and 1 tube refrigerated pizza dough, baked 40-50 minutes at 350 degrees to bake up the scalloped bread slices pictured. 


Mix Mascarpone cheese, sifted powdered sugar and lemon zest and juice in a small bowl. Spread cinnamon toasts generously with mascarpone cheese spread.  Top cheese with 3-4 sliced almonds. 
Add 1/4 tsp cinnamon to left over cranberry sauce and top cheese toasts with about 1 tsp cranberry sauce. Garnish with more lemon zest and finely minced rosemary. 
Other recipes to try:
Cranberry Orange Buttermilk Cake
Blackberry Oatmeal Bars
Zucchini Bruschetta